
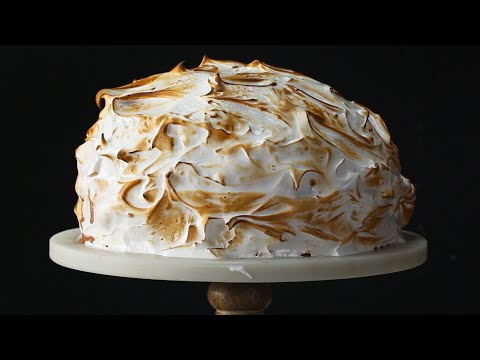
Baked Alaska pairs a layer of cake and a dome of ice cream beneath a thick, toasted meringue shell. The contrast is the point: warm, lightly crisp meringue around cold ice cream and tender cake.
This version makes the timing manageable by freezing the cake-and-ice-cream base until firm, then covering it completely with Swiss meringue. Heating the egg whites and sugar to 160°F before whipping gives you a stable, cooked meringue to brown in a very hot oven or with a kitchen torch. The finished dessert tastes sweet and creamy, with a soft sponge cake center and a hint of vanilla.
Why This Recipe Works
Ice cream is shaped and frozen before it goes near the oven. Starting with a very cold, solid base buys time during browning, when the goal is to color the outside without letting the ice cream melt. A short final bake at high heat—or a quick pass with a torch—does that more effectively than baking at a moderate temperature for a long time.
The meringue is the insulation. It needs to cover the cake and ice cream all the way to the plate, with no gaps or thin patches. Swiss meringue is a good fit here: sugar dissolves into the egg whites over simmering water, and the mixture is heated to 160°F before whipping. It becomes glossy and sturdy enough to spread or pipe over the frozen dome.
A modest layer of sponge cake gives the dessert a base without making it difficult to cut or overwhelming the ice cream. A little simple syrup is optional; use it if the cake is dry, but keep the layer lightly moistened rather than soggy.
Ingredients
- 1 layer (8 inches wide and about 1 inch thick) sponge cake, store-bought or homemade
- 1/4 cup simple syrup, optional
- 1 1/2 quarts (6 cups) ice cream, in one flavor or a combination
- 4 large pasteurized egg whites, about 1/2 cup
- 1 cup granulated sugar
- 1/4 teaspoon cream of tartar
- 1 teaspoon vanilla extract
- 1/8 teaspoon fine salt
Ingredient Notes
Sponge cake: An 8-inch round, roughly 1 inch thick, is easy to fit beneath a molded ice cream dome. A plain sponge cake, génoise, or similarly light cake works well. If your cake is thicker, trim it to about 1 inch so the meringue can cover the base without an overly tall dessert. Store-bought cake is convenient; homemade cake should be completely cool before assembly.
Simple syrup: This is optional and is only there to add moisture to a dry cake. Brush it on sparingly. If you do not have syrup, leave it out; do not substitute a large amount of juice or another liquid, which can make the cake wet and hard to handle.
Ice cream: Choose a flavor that is firm when frozen and that you enjoy with cake and vanilla meringue. Vanilla, chocolate, strawberry, and coffee are straightforward choices. Let the ice cream soften just enough to pack into a bowl, then freeze it until solid again. A bowl with a 7- to 8-inch opening gives a dome that sits neatly on the cake.
Egg whites: Use pasteurized egg whites, preferably pasteurized shell eggs separated at home or a carton product specifically labeled as suitable for whipping. Some carton egg whites are not formulated to whip well. Heating the egg whites and sugar to 160°F is an important safety step; do not rely on the brief browning step to cook the meringue through.
Sugar, cream of tartar, vanilla, and salt: Sugar sweetens and helps the whipped whites hold their shape. Cream of tartar helps stabilize the foam. Vanilla adds a familiar flavor, while a little salt keeps the sweetness from tasting flat. If you do not have cream of tartar, use 1 teaspoon lemon juice in its place.
Instructions
- Line a bowl and shape the ice cream. Line a 7- to 8-inch-wide bowl with plastic wrap, leaving enough overhang to lift the ice cream out later. Let the ice cream soften at room temperature for about 5 to 10 minutes, just until it can be packed without force. Press it into the bowl in an even layer, cover, and freeze for at least 6 hours or until completely firm. The surface should feel solid, not soft or yielding; a firm dome is less likely to slump during assembly.
- Prepare the cake. Set the sponge cake on a flat, freezer-safe plate or small baking sheet. If using simple syrup, brush it lightly over the top of the cake. The surface should feel barely moist, not saturated. Cover and freeze the cake for at least 30 minutes. Chilling firms it so the ice cream can be positioned without squashing the base.
- Set up for the meringue. Put a few inches of water in a saucepan and bring it to a gentle simmer. Choose a heatproof bowl that sits over the pan without touching the water. Make sure the bowl and whisk are clean and free of grease; grease can keep egg whites from whipping to full volume. Have a food thermometer ready, and preheat the oven to 500°F if you plan to brown the dessert in the oven.
- Heat the egg whites and sugar. Add the egg whites, sugar, and cream of tartar to the heatproof bowl. Set it over the simmering water and whisk constantly, scraping around the sides, until the mixture reaches 160°F. It should feel smooth when rubbed between two clean fingers, with no undissolved sugar grains. The thermometer reading matters more than the texture: keep whisking and heating until it reaches 160°F, then remove the bowl from the pan.
- Whip the meringue. Beat the warm egg-white mixture with a mixer on medium-high speed for about 5 to 8 minutes. Add the vanilla and salt once the mixture is foamy. Continue beating until the meringue is glossy, holds stiff peaks, and the outside of the bowl no longer feels warm. If the peaks droop, beat for another minute or two. A cool, firm meringue is easier to spread and helps keep the ice cream covered.
- Assemble the dome. Uncover the cake. Lift the frozen ice cream from its bowl using the plastic wrap, remove the wrap, and set the dome flat-side down on the cake. Work quickly; if the ice cream starts to soften, return the cake and ice cream to the freezer for 15 to 20 minutes before continuing. The dome should sit centered on the cake with a narrow cake border visible around it.
- Cover completely with meringue. Spoon or pipe the meringue over the ice cream and cake, starting at the top and working down. Spread it to the plate around the entire edge so no cake or ice cream is exposed. Make a layer at least 1/2 inch thick over the dome, and use the back of a spoon to make swirls or peaks. Check around the base for gaps; exposed spots let heat reach the ice cream directly.
- Brown the meringue. For the oven method, place the assembled dessert on a baking sheet and bake at 500°F for 3 to 5 minutes, watching continuously. Take it out when the peaks and ridges are toasted golden brown; the meringue should still hold its shape and the dessert should not be left in the oven to warm through. Oven times vary, so use the color as your cue. Alternatively, use a kitchen torch in short, moving passes until the surface is browned. Keep the flame moving and follow the torch maker’s instructions.
- Serve promptly. Use a long, sharp knife to cut through the meringue, ice cream, and cake. Wipe the knife between cuts for cleaner portions. Serve as soon as possible after browning, while the meringue is warm and the ice cream remains firm.
Tips for Success
- Freeze the dome until truly solid. Six hours is a minimum for many freezers and bowl shapes; overnight is more dependable. If the center is still soft, it will melt before the outside has time to brown.
- Keep the cake and ice cream cold during assembly. Have the meringue ready before you unmold the ice cream. If the dessert becomes soft or starts to slide, put it back in the freezer rather than trying to cover a melting dome.
- Cover every seam. Bring the meringue down to the plate, and make sure it seals the cake edge. Even a small uncovered patch can let the high heat reach the ice cream.
- Use a thermometer for the egg-white mixture. The bowl can feel hot before the mixture reaches 160°F. Stir constantly and measure in the mixture, avoiding contact between the thermometer tip and the bowl.
- Make the meringue bowl spotless. A trace of egg yolk or grease can prevent good volume. Separate eggs while cold, then let the whites come closer to room temperature before whipping.
- Watch the oven, not the clock alone. At 500°F, the meringue can go from toasted to too dark quickly. Stay nearby and remove the dessert when the ridges are golden.
- Choose a sturdy serving plate. Use a freezer-safe plate or baking sheet for assembly and browning. Avoid a cold glass plate under a very hot broiler or oven unless it is specifically rated for that use.
Troubleshooting
The ice cream is melting while I assemble it. The dome may not have frozen long enough, the kitchen may be warm, or assembly may be taking too long. Return the cake and ice cream to the freezer for 15 to 20 minutes, then continue. If the ice cream has become very soft, chill it until firm before adding meringue.
The meringue is runny or will not hold peaks. Keep whipping; a Swiss meringue can take several minutes to become firm. If it remains loose, the bowl may have had grease or yolk in it, or the whites may not be a suitable whipping product. Use clean equipment and pasteurized whites labeled for whipping next time. Do not use a runny meringue to cover the dessert because it can slide off and leave gaps.
The sugar feels gritty. It was not fully dissolved before whipping. Keep the egg whites and sugar over gentle simmering water and whisk until the mixture feels smooth between your fingers and reaches 160°F. Avoid letting the bowl touch the water, which can cook the whites against the bottom.
The meringue browns unevenly. Peaks and thin patches color first. Spread the meringue in an even layer and turn the baking sheet if your oven browns more strongly on one side. With a torch, keep it moving rather than holding the flame on one spot.
The ice cream melts before the meringue browns. Check that the oven is fully preheated to 500°F and the ice cream is thoroughly frozen. Make sure the meringue forms a complete, thick covering. If your oven takes longer to brown the dessert, use a torch for more direct, localized browning.
The cake is soggy or the portions are difficult to cut. Use less syrup, or skip it if the cake is already moist. For cleaner slices, serve immediately after browning and use a sharp knife warmed in hot water and wiped dry between cuts.
Variations
Change the ice cream: Use one flavor for a neat, even dome, or layer two flavors in the bowl. If layering, freeze the first flavor until firm before adding the second so the colors and flavors remain distinct. Chocolate cake with vanilla ice cream, or sponge cake with strawberry ice cream, both work well.
Add a thin fruit layer: Spread a thin layer of thick jam on the cake before adding the ice cream, or serve fresh berries alongside. Keep wet fruit or loose sauce out from between the cake and ice cream; excess moisture can make the base slippery.
Flavor the meringue: Replace the vanilla with 1/2 teaspoon almond extract or finely grated citrus zest. Keep additions modest so the meringue remains easy to spread and holds its shape.
Make individual portions: Cut the cake into rounds or squares and place a small scoop of firmly frozen ice cream on each. Cover each portion fully with meringue. Smaller portions brown quickly, so watch closely and work in batches if needed.
What to Serve With It
Baked Alaska is rich and sweet, so simple accompaniments are usually best. Serve it with fresh raspberries, sliced strawberries, or another tart fruit. A small amount of warm chocolate sauce or a berry sauce can be spooned onto the plate, rather than poured over the meringue, so the toasted surface stays visible. Coffee or unsweetened tea is also a good match.
Make-Ahead, Storage and Reheating
Make ahead: The ice cream dome can be molded, covered, and kept frozen for up to 2 days before assembly. The cake can also be wrapped and frozen separately. Make the Swiss meringue shortly before assembling; it is easiest to spread while freshly whipped. For a fully assembled dessert, cover the meringue-coated dome and freeze it for up to 1 day before browning. Browning just before serving gives the best contrast.
Storage: Baked Alaska is best eaten right after browning. If there are leftovers, cover and return them to the freezer promptly. For food safety, do not leave the ice-cream dessert at room temperature for more than 2 hours, or more than 1 hour when the temperature is above 90°F. Keep frozen leftovers at 0°F; they remain safe while continuously frozen, though the cake and meringue gradually lose quality. For the best texture, use within a few days.
If a portion has softened in the refrigerator, keep it refrigerated and use it within 3 to 4 days, the USDA guidance for refrigerated leftovers. Do not refreeze ice cream that has been at room temperature beyond the safe time limits. When in doubt about how long it has been warm, discard it.
Reheating: Do not reheat Baked Alaska. Heat will melt the ice cream. If you want the meringue freshly browned, brown the dessert immediately before serving rather than trying to warm leftovers.
Recipe Card
Servings: 8
Prep time: 35 minutes active, plus at least 6 hours freezing
Cook time: 3 to 5 minutes
Total time: About 7 hours, including minimum freezing time
Ingredients
- 1 layer (8 inches wide and about 1 inch thick) sponge cake
- 1/4 cup simple syrup, optional
- 1 1/2 quarts (6 cups) ice cream
- 4 large pasteurized egg whites, about 1/2 cup
- 1 cup granulated sugar
- 1/4 teaspoon cream of tartar
- 1 teaspoon vanilla extract
- 1/8 teaspoon fine salt
Condensed steps
- Line a 7- to 8-inch bowl with plastic wrap. Pack softened ice cream into it, cover, and freeze at least 6 hours, until solid.
- Set the cake on a freezer-safe plate, brush lightly with syrup if using, cover, and freeze for at least 30 minutes.
- Over simmering water, whisk egg whites, sugar, and cream of tartar until the mixture reaches 160°F and feels smooth. Beat with vanilla and salt until glossy, stiff peaks form and the bowl is cool.
- Unmold the ice cream onto the cake. Cover the dome and cake completely with at least a 1/2-inch layer of meringue, sealing it to the plate.
- Bake on a baking sheet at 500°F for 3 to 5 minutes, watching until golden, or brown with a moving kitchen-torch flame. Slice and serve promptly.
Frequently Asked Questions
Can I make Baked Alaska without a kitchen torch?
Yes. Bake it in a fully preheated 500°F oven for 3 to 5 minutes, watching continuously. The oven browns the meringue while the frozen center stays cold, provided the ice cream is firm and the meringue completely covers it.
Can I use store-bought cake?
Yes. Choose a plain sponge cake or another light, unfrosted cake that fits your plate. If it is thicker than about 1 inch, trim it down so the ice cream dome is not too tall to cover evenly.
Can I use carton egg whites?
Only if the package says they are suitable for whipping. Some carton whites do not whip to the volume or stiffness needed for meringue. Pasteurized shell eggs are another option; separate them carefully and heat the whites with the sugar to 160°F.
Why does the egg-white mixture need to reach 160°F?
Heating the mixture to 160°F is the safety step for the egg whites. The short oven browning or torching time is for color, not a reliable way to cook the center of the meringue.
Can I assemble the whole dessert the day before?
Yes. Cover the assembled, unbrowned dessert and freeze it for up to 1 day. Brown it just before serving. Keep the dessert frozen until it is ready to go into the hot oven or be torched.
How can I tell if the ice cream dome is frozen enough?
It should hold its shape firmly when unmolded and feel solid rather than soft when gently pressed through the wrap. If the dome sags or begins to slide as you assemble, return it to the freezer before covering it.
Can I use a broiler instead of a hot oven?
A broiler can brown the meringue, but it may color the top very quickly and unevenly. Keep the dessert several inches from the element, watch it continuously, and use the oven’s high-heat setting instead if you are unsure how your broiler behaves.
Can I make this with different ice cream flavors?
Yes. Use one flavor or layer two flavors in the mold. If layering, freeze each layer until firm before adding the next. Avoid mixing in large pieces of candy or cookies, which can make the dome harder to mold and slice neatly.