
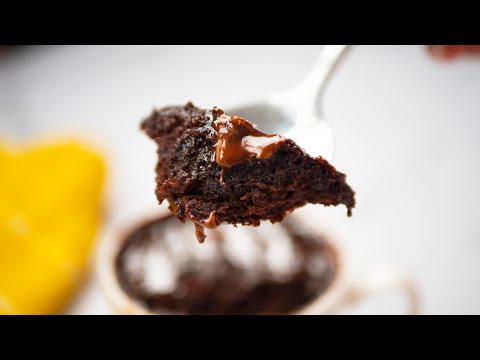
This chocolate mug cake is a warm, single-serving cake mixed and cooked right in a mug, so it can go from pantry ingredients to dessert with very little cleanup. It is made without eggs, which keeps the ingredient list simple and gives the crumb a soft, pudding-like tenderness when you stop cooking as soon as the center is set.
This version balances cocoa, sugar, and vanilla for a chocolate flavor that is rich without being overly sweet. Mixing the dry ingredients thoroughly before adding the milk and oil helps prevent bitter cocoa pockets, while a short rest after cooking lets the cake finish gently. Expect a tender, moist crumb, with chocolate chips or nuts for extra texture if you like.
Why This Recipe Works
A mug cake is small, so little mixing or cooking differences show up quickly. The dry ingredients are stirred together first to spread the cocoa, salt, and baking powder evenly through the flour. That means each bite rises and tastes consistently, rather than having a concentrated patch of cocoa or a salty spot.
Milk supplies the liquid needed to hydrate the flour and cocoa, while vegetable oil adds tenderness without needing softened butter or a mixer. Oil stays fluid as the cake cools, helping the crumb remain soft. Vanilla rounds out the flavor and makes the cocoa taste fuller, even though the recipe uses everyday pantry ingredients.
The baking powder provides lift without eggs. Because there is no egg to bind the batter, the cake is especially sensitive to overcooking: too much heat can make it rubbery or dry. Short cooking, a check for doneness, and a brief rest use carryover heat to finish the middle without pushing the edges too far.
Finally, the batter is cooked in the same vessel in which it is served. A roomy, microwave-safe mug gives the cake space to rise and reduces the chance of overflow. If you prefer to use an oven, the batter can go into an oven-safe ramekin instead; that gentler, longer bake produces a slightly more even crumb.
Ingredients
- 1/4 cup all-purpose flour
- 2 tablespoons granulated sugar
- 2 tablespoons unsweetened cocoa powder
- 1/4 teaspoon baking powder
- 1/8 teaspoon fine salt
- 3 tablespoons milk
- 1 tablespoon vegetable oil
- 1/4 teaspoon vanilla extract
- 1 tablespoon chocolate chips or chopped nuts, optional
Ingredient Notes
Flour: All-purpose flour gives the cake enough structure to rise while keeping the crumb tender. Spoon flour into the measuring cup and level it off rather than packing it down; too much flour makes a small cake noticeably dry. A measure-for-measure gluten-free flour blend may work, but blends vary, so the texture may be a little different.
Sugar: Granulated sugar sweetens the cocoa and helps keep the cake moist. Brown sugar can replace it for a softer, slightly more caramel-like flavor. Avoid reducing the sugar too much: besides sweetness, it affects the cake’s tenderness.
Cocoa powder: Use unsweetened cocoa, either natural or Dutch-process. Natural cocoa has a sharper, fruitier edge, while Dutch-process cocoa tends to taste rounder and darker. Do not substitute sweetened drinking chocolate without adjusting the sugar, since it contains added sweetener and may include other ingredients.
Baking powder and salt: Baking powder gives the batter its lift. Use baking powder rather than baking soda; soda needs an acidic ingredient to work properly, and this batter does not have enough acid to rely on it. A little salt makes the chocolate taste more balanced. If using salted nuts, you can reduce the salt slightly.
Milk: Dairy milk makes a straightforward, moist batter. Unsweetened oat, soy, or almond milk can be used in the same amount. Sweetened or flavored milk changes the final sweetness and taste, so choose it intentionally.
Oil and vanilla: Neutral vegetable oil keeps the crumb soft and lets the cocoa lead. Canola oil is a suitable substitute. Olive oil can work, but its flavor may come through. Vanilla extract adds warmth; omit it if you do not have any, or use the same amount of another vanilla extract.
Optional mix-in: Chocolate chips create soft, melty pockets, while chopped nuts add crunch. Keep the amount modest so the batter still cooks evenly. If adding nuts, chop them small enough to distribute through a few spoonfuls of batter.
Instructions
- Choose the cooking vessel. For the microwave, use a roomy microwave-safe mug so the batter has space to rise. For the oven method, heat the oven to 350°F (175°C) and use an oven-safe ramekin. A regular mug is not necessarily oven-safe, even if it works in a microwave; check the vessel’s guidance before baking. This setup prevents spills and avoids exposing the wrong dish to oven heat.
- Combine the dry ingredients. Add the flour, sugar, cocoa powder, baking powder, and salt to the mug or ramekin. Stir carefully with a fork until the mixture is an even color, paying attention to the bottom and sides. Breaking up visible cocoa lumps now keeps the finished cake from having dry, bitter pockets.
- Add the wet ingredients. Pour in the milk, oil, and vanilla. Stir until no dry flour remains and the batter looks smooth, scraping the bottom once or twice. Stop as soon as it comes together; vigorous or prolonged mixing can develop the flour and make the cake tougher. Fold in the chocolate chips or nuts if using.
- Cook in the microwave or oven. For the microwave, cook at full power for 60 seconds, then check the top. If it still looks wet in the center, continue in 10-second bursts until the surface is mostly set and no liquid batter is visible. Many microwaves finish the cake in about 60 to 90 seconds, but wattage and mug shape make a difference. For the oven, bake at 350°F (175°C) for 12 to 16 minutes. The edges should look set and the center should spring back lightly when touched; a tester should come out with moist crumbs, not wet batter. The microwave method is quicker, while the oven method heats more gradually.
- Rest before eating. Let the cake stand for 1 to 2 minutes after cooking. The mug will be hot, and the center continues to set from residual heat. Look for a tender, just-set middle rather than a dry, firm surface. If the center is still raw after resting, return it to the microwave for a short burst, then let it stand again.
- Serve from the mug or loosen the edges. Eat the cake warm with a spoon, or run a small knife around the edge and turn it out onto a plate if you baked it in a ramekin. Take care with steam and hot chocolate pockets. Serving while warm keeps the crumb soft and the optional chocolate chips pleasantly melty.
Tips for Success
- Measure flour lightly. A packed measuring cup adds more flour than the batter needs, and there is little extra liquid in this small recipe to compensate.
- Use a mug with enough headroom for the cake to rise. If the batter fills the vessel close to the rim, divide it between two smaller cups or choose a wider, taller mug.
- Stir the dry ingredients well before adding liquid. Cocoa tends to cling in small lumps, and they are harder to smooth out once the batter is wet.
- Do not aim for a completely dry-looking top. The cake can continue cooking briefly after the microwave stops; waiting for a firm, dry center is a common route to a tough result.
- Microwave in short bursts after the first minute. Small changes in microwave power, mug thickness, and batter depth can shift the finish time.
- For a more chocolate-forward bite, add the optional chips. For a cleaner cocoa flavor, leave them out and serve the cake with a spoonful of cream or fruit.
- Use a fork or small whisk to mix, and scrape the bottom of the mug. Dry flour hiding underneath can leave a gummy patch in the finished cake.
Troubleshooting
The cake is dry or rubbery. It was probably cooked too long, or the flour was packed into the measuring cup. Stop when the top is mostly set, use short finishing bursts, and let carryover heat do the last bit of work. For the next cake, measure the flour lightly.
The cake overflowed. The mug may have been too small, or the batter was cooked for too long without a check. Use a roomier mug and leave plenty of space above the batter. If you do not have one, split the batter between two microwave-safe cups.
The middle is wet while the edges are firm. Microwave ovens can heat unevenly, and a narrow mug makes a deeper layer of batter. Stir thoroughly before cooking, use a wider vessel if possible, and add brief cooking bursts while checking the center. The rest after cooking also helps the middle set.
The cake tastes bitter. Check that the cocoa is unsweetened cocoa powder rather than a very dark baking ingredient you did not intend to use, and measure the salt carefully. Cocoa flavor can also seem more intense if the sugar was reduced. A little milk or a sweet topping can soften the impression without changing the batter.
The texture is gummy or dense. Look for unmixed flour at the bottom, too much flour overall, or mixing after the batter is already smooth. Scrape the mug while mixing and stop once the dry streaks disappear. Baking powder that has been open for a long time may also have lost some of its lifting power.
The cake rose and then sank. A small amount of settling is normal as a hot cake cools. A dramatic collapse can mean the center was undercooked or the batter had too much baking powder. Cook until the top is mostly set, and measure the leavener level rather than heaping it.
Variations
Mocha: Stir a small pinch of instant espresso powder into the dry ingredients. It deepens the cocoa impression without turning the cake into a coffee-flavored dessert.
Peanut butter chocolate: Swirl a teaspoon of peanut butter into the batter just before cooking. It will make the center richer, so keep the amount small and check doneness carefully.
Chocolate orange: Add a little finely grated orange zest to the wet ingredients. Use only the colored outer peel; the white pith underneath tastes bitter.
Nutty crunch: Fold chopped pecans, walnuts, or hazelnuts into the batter, or scatter them on top after cooking. Toasted nuts give a more pronounced flavor, but let them cool before adding.
Simple dairy-free version: Use an unsweetened plant milk in place of dairy milk and check that any chocolate chips are suitable for your needs. The oil is already dairy-free.
Less sweet: A small reduction in sugar is possible, though the cake will taste more intensely cocoa-forward and may be a little less tender. For a balanced result, keep the listed amount and choose unsweetened toppings instead.
What to Serve With It
This cake is satisfying on its own, especially while the middle is warm. A spoonful of lightly sweetened whipped cream, plain yogurt, or vanilla ice cream adds a cool, creamy contrast. Fresh berries offer a tart note that works well with cocoa; sliced banana brings extra softness and sweetness. If you prefer a simple finish, dust the top with a little cocoa powder or add a few chocolate chips while the cake is still warm.
For a richer dessert, serve it with a small spoonful of nut butter or caramel sauce. Keep toppings light if you want the cake itself to stay the focus, and add cold toppings just before serving so they do not warm and melt into the surface.
Make-Ahead, Storage and Reheating
This recipe is best mixed and cooked just before eating. The batter contains baking powder, so leaving it to stand for a long time before cooking can reduce its lift. For easier assembly, measure the dry ingredients into the mug ahead of time, cover it, and add the milk, oil, and vanilla when you are ready to cook. Add optional chips or nuts at that point as well.
If you have leftover cake, cool it promptly, cover it, and refrigerate it within two hours. For conservative leftover storage, keep it refrigerated for three to four days. The crumb will firm up in the cold, so it is usually more pleasant warmed than eaten straight from the refrigerator.
To freeze, let the cake cool completely, then transfer it out of the mug to a freezer-safe container or wrap it well. Freeze for three to four months for best quality. Thaw it in the refrigerator or reheat it from frozen in short microwave bursts, checking often so the edges do not dry out.
Reheat a refrigerated portion in the microwave in short bursts until hot throughout. If reheating leftovers for food safety, USDA guidance is to heat them to 165°F (74°C); a food thermometer is the reliable way to check. A small cake can overcook quickly, so use a low starting time and add only what is needed. Let it stand briefly before eating because the center can be hotter than the surface.
Recipe Card
Servings: 1
Prep time: 5 minutes
Cook time: 1 minute in the microwave, or 12 to 16 minutes in the oven
Total time: About 6 minutes in the microwave, including a short rest
Ingredients
- 1/4 cup all-purpose flour
- 2 tablespoons granulated sugar
- 2 tablespoons unsweetened cocoa powder
- 1/4 teaspoon baking powder
- 1/8 teaspoon fine salt
- 3 tablespoons milk
- 1 tablespoon vegetable oil
- 1/4 teaspoon vanilla extract
- 1 tablespoon chocolate chips or chopped nuts, optional
Condensed Instructions
- Stir flour, sugar, cocoa, baking powder, and salt in a roomy microwave-safe mug, or in an oven-safe ramekin.
- Add milk, oil, and vanilla. Mix just until smooth, scraping the bottom; fold in chips or nuts if using.
- Microwave at full power for 60 seconds, then continue in 10-second bursts until the top is mostly set. Or bake at 350°F (175°C) for 12 to 16 minutes, until the edges are set and the center springs back lightly.
- Rest for 1 to 2 minutes before serving warm.
Frequently Asked Questions
Can I make this without a microwave?
Yes. Use an oven-safe ramekin rather than an ordinary mug unless the mug is specifically marked oven-safe. Bake at 350°F (175°C) for 12 to 16 minutes, checking for set edges and a center that springs back lightly.
Why did my mug cake turn out tough?
Overcooking is the most common reason. Microwave power and mug shape affect timing, so check the cake early and use short bursts at the end. Mixing the batter for longer than needed or measuring too much flour can also make the crumb firm.
Can I mix the batter directly in the mug?
Yes, and that is the point of this recipe. Mix the dry ingredients thoroughly first, then add the wet ingredients and scrape the bottom and sides. If your mug is narrow, using a small bowl for mixing can make it easier to combine the batter evenly before transferring it.
Can I use butter instead of vegetable oil?
Melted butter can replace the oil in the same amount. It gives a buttery flavor, though the cake may feel a little firmer as it cools because butter firms up more than oil. Let melted butter cool slightly before stirring it into the milk.
Can I make it without cocoa powder?
This recipe is designed around cocoa, so leaving it out changes both the flavor and the dry-to-wet balance. For a vanilla mug cake, use a recipe formulated for that style rather than simply omitting the cocoa.
How do I know when the microwave cake is done?
The surface should look mostly set, with no visible pool of liquid batter. The center may look softer than the edges, but it should not be raw. Let the cake stand briefly; if the center remains wet afterward, cook it in another short burst.
Can I double the recipe in one mug?
It is better to divide doubled batter between two roomy mugs or ramekins. A deeper amount of batter heats less evenly, making it easy to overcook the outside before the center is set. Cook each portion separately in the microwave for more predictable results.
Can I prepare the dry mix ahead?
Yes. Combine the flour, sugar, cocoa, baking powder, and salt in the mug and cover it until needed. Add the milk, oil, and vanilla just before cooking, since letting wet batter sit can weaken the baking powder’s lift.