
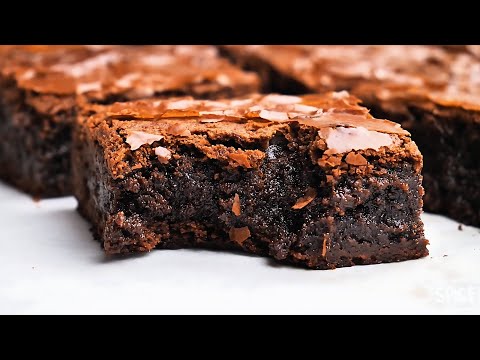
These brownies are deeply chocolatey, dense in the middle, and topped with a thin, delicate crust. Melted chocolate gives them richness, while cocoa powder adds a darker, more concentrated chocolate flavor.
The method is simple but deliberate: warm the butter and chocolate together, beat the eggs with the sugars until glossy, then fold in the flour gently. The result is a fudgy brownie that slices neatly after cooling, with a soft center and just enough chew at the edges.
Why This Recipe Works
Using both melted chocolate and cocoa powder builds a fuller chocolate flavor than relying on either alone. The melted chocolate contributes richness and a smooth, dense texture; cocoa brings intensity without adding extra liquid. Choose a semisweet chocolate you enjoy eating, since its flavor carries through the finished brownies.
Butter is melted with the chocolate rather than creamed with sugar. That keeps the batter compact and helps produce a fudgy crumb instead of a light, cake-like one. A mix of granulated and light brown sugar adds sweetness and gives the center a little extra moisture and chew.
Beating the eggs and sugars until thick and glossy helps dissolve some of the sugar and creates a fine, shiny crust on top. Once the flour goes in, the approach changes: fold only until the dry streaks disappear. Too much mixing develops gluten, which can make brownies tough or bready.
Finally, the brownies come out before a tester turns completely clean. A few moist crumbs are a better sign of fudgy doneness than a dry toothpick. Cooling is part of the recipe, not an optional wait: the center firms as it cools, making clean slices possible without sacrificing a soft texture.
Ingredients
- 6 oz semisweet chocolate, chopped, divided into 4 oz for melting and 2 oz for folding in
- 1/2 cup unsalted butter, cut into pieces
- 1/4 cup unsweetened cocoa powder
- 1 cup granulated sugar
- 1/2 cup packed light brown sugar
- 2 large eggs, at room temperature
- 1 large egg yolk, at room temperature
- 1 tsp vanilla extract
- 3/4 cup all-purpose flour, spooned into the measuring cup and leveled
- 1/2 tsp fine salt
Ingredient Notes
Chocolate: Semisweet chocolate gives a balanced, familiar brownie flavor. Chopped chocolate melts more evenly than large pieces. If you prefer a sweeter result, use milk chocolate for the folded-in pieces, but keep semisweet chocolate for the melted portion so the brownies retain depth. Chocolate chips can work, though they may contain stabilizers and may not melt as smoothly.
Cocoa powder: Natural unsweetened cocoa powder is a straightforward choice here. Dutch-process cocoa also works, though it may give a darker, rounder flavor. Do not substitute sweetened drinking chocolate; it contains sugar and other ingredients that change the balance.
Butter: Unsalted butter lets you control the salt level. If using salted butter, reduce the added salt to a small pinch. Butter gives the batter richness and helps carry the chocolate flavor.
Sugars: Granulated sugar supports the glossy crust, while brown sugar adds a subtle molasses note and tenderness. Dark brown sugar can replace light brown sugar for a deeper caramel flavor. Avoid reducing the sugar substantially: it affects not just sweetness but also moisture and texture.
Eggs: Eggs bind the batter and give it structure. The extra yolk adds richness without making the brownies airy. Room-temperature eggs blend more easily into the warm chocolate mixture. To bring cold eggs closer to room temperature, set them in a bowl of warm tap water for a few minutes.
Flour: Measuring flour accurately matters because excess flour is one of the quickest routes to dry brownies. Spoon it into the measuring cup and level the top rather than packing it down. For a gluten-free version, use a cup-for-cup gluten-free baking blend that includes a binder; expect a somewhat different texture.
Salt and vanilla: Salt sharpens the chocolate flavor and balances the sugars. Fine salt disperses evenly. Vanilla rounds out the flavor; pure vanilla extract or a good-quality vanilla flavoring both work.
Instructions
- Prepare the pan and oven. Heat the oven to 350°F. Line an 8-inch square baking pan with parchment, leaving a little overhang on two sides, and lightly grease any exposed sides. The parchment makes it easier to lift the cooled brownies out intact.
- Melt the chocolate and butter. Put 4 oz of the chopped chocolate and the butter in a heatproof bowl. Set it over a saucepan of gently simmering water, making sure the bowl does not touch the water, and stir until smooth. Alternatively, microwave in short bursts, stirring between each, until just melted. Remove from the heat and whisk in the cocoa powder. The mixture should look glossy and smooth, not scorched; let it cool until warm rather than hot so it does not scramble the eggs.
- Beat the eggs and sugars. In a large bowl, whisk the granulated sugar, brown sugar, eggs, and yolk for 2 to 3 minutes, until the mixture looks thicker, paler, and glossy. A hand mixer on medium speed works, or use a sturdy whisk and a little elbow grease. This step helps create the thin, crackly top.
- Add the chocolate and vanilla. Slowly whisk the warm chocolate mixture into the egg mixture, then stir in the vanilla. Scrape the bowl so the batter is evenly combined. It should be shiny and fairly thick; if the chocolate mixture feels hot to the touch, pause briefly before combining.
- Fold in the dry ingredients. Sprinkle the flour and salt over the batter. Fold with a spatula just until no dry flour remains, then fold in the remaining 2 oz chopped chocolate. The batter will be thick. Stop mixing as soon as it is uniform; vigorous stirring at this point can make the crumb tough.
- Bake until the center is just set. Spread the batter evenly in the prepared pan and bake for 24 to 30 minutes. Begin checking at 24 minutes. The edges should look set and may pull slightly from the pan, while the center should no longer look liquid. A toothpick inserted near the center should come out with moist crumbs, not raw batter and not completely clean. For an egg-safety check, the center should reach 160°F on an instant-read thermometer; avoid repeatedly opening the oven while they bake.
- Cool before cutting. Set the pan on a rack and cool completely, about 2 hours, before lifting out and slicing. The brownies continue to settle as they cool, so cutting them warm can make the center seem underdone and the pieces fall apart. Use a sharp knife and wipe it between cuts for neater edges.
Tips for Success
- Use a light-colored metal pan if possible. It heats predictably and helps the edges bake without becoming too dark. Glass and dark pans can brown the edges more quickly, so start checking early.
- Keep the chocolate warm, not hot. Very hot chocolate can cook the eggs on contact. Let the melted mixture cool until you can comfortably hold your hand near the bowl before adding it.
- Do not pack the flour. A heavy scoop can add more flour than intended. Spoon it into the cup and level it, or weigh it if you have a kitchen scale.
- Fold rather than beat after adding flour. Scrape along the bottom and turn the batter over itself until the last flour streaks disappear. A few extra folds are unnecessary.
- Use the edges and center together to judge doneness. The perimeter firms first. If it is set but the middle still looks wet, give the pan a few more minutes and check again.
- Let the brownies cool fully. This is the easiest way to get a dense, clean slice. For especially tidy edges, chill the cooled slab briefly before cutting, then bring the pieces back toward room temperature for serving.
- Line the pan with an overhang. Parchment handles make lifting easier and reduce the chance of scratching the pan while cutting.
Troubleshooting
The brownies are dry or cakey. They may have baked too long, contained too much flour, or been mixed vigorously after the flour was added. Check early, measure flour carefully, and remove the pan when the center has moist crumbs rather than waiting for a clean tester.
The center seems raw after cooling. A fudgy brownie should be moist, but it should not contain liquid batter. If the center is glossy and unset, return the pan to the oven for a few minutes and check again. If the brownies are already fully cool, cut pieces and warm them briefly before serving; baking the whole pan again can overcook the edges.
The top is not shiny or crackly. Make sure the eggs and sugars are whisked until thick and glossy, and use granulated sugar as written. The crust can vary with the chocolate, sugar, and mixing method, so a less crackled top does not necessarily mean the brownies have failed.
The edges are hard before the center is done. The pan may be dark, the oven may run hot, or the batter may be spread unevenly. Check your oven with an oven thermometer if you have one, use a light-colored pan, and smooth the batter into the corners before baking.
The brownies crumble when sliced. They may be warm, or the knife may be dragging through melted chocolate. Cool them completely and use a sharp knife, cleaning the blade between cuts. A short chill can make the slab easier to portion.
The chocolate mixture looks grainy or seized. Water or steam may have reached the chocolate, or it may have overheated. Melt gently and keep the bowl and utensils dry. If it is only slightly thick, whisk in the butter mixture thoroughly; if it has turned into a stiff mass, the texture may not recover fully.
Variations
Walnut brownies: Fold in 1/2 cup chopped toasted walnuts with the remaining chocolate. Toasting brings out their flavor, but let them cool before adding so they do not warm the batter.
Extra chocolate: Replace the folded-in chopped chocolate with dark chocolate chunks, or add a small handful of chocolate chips. Keep the total amount modest so the brownies still hold together when sliced.
Salted top: Sprinkle a light pinch of flaky salt over the batter just before baking. The contrast works especially well with semisweet chocolate; use a restrained hand because the batter already contains salt.
Swirled brownies: Spoon a few small dollops of smooth peanut butter or thick caramel over the batter and draw a skewer through them in broad curves. Avoid adding too much, which can leave soft pockets that make the center harder to judge.
Mint or coffee note: Replace the vanilla with a modest amount of peppermint extract for a mint-chocolate variation, or add a little instant espresso powder to the cocoa. These additions should support the chocolate rather than overpower it.
What to Serve With It
Serve a brownie on its own with coffee, black tea, or a glass of milk. For dessert, add a scoop of vanilla ice cream or a spoonful of softly whipped cream. Fresh raspberries or sliced strawberries bring a tart contrast to the sweet, rich crumb.
If serving the brownies warm, heat an individual piece briefly and add ice cream just before serving. A cool topping emphasizes the fudgy texture, while a little fruit keeps the plate from feeling too rich. These brownies are also easy to pack for a picnic or lunch once fully cooled and wrapped.
Make-Ahead, Storage and Reheating
Bake the brownies a day ahead if convenient. Once completely cool, keep them in an airtight container so the cut edges do not dry out. For the best texture, cut them shortly before serving, or store the slab whole and slice as needed.
For longer storage, refrigerate the brownies in an airtight container for three to four days. Chilling makes them firmer and intensifies their dense texture; let a piece sit at room temperature before serving if you prefer a softer center. Refrigerate promptly rather than leaving perishable foods at room temperature for extended periods.
Brownies freeze well. Wrap individual pieces or the cooled slab tightly, place in a freezer-safe container, and freeze for up to three to four months. Thaw wrapped brownies in the refrigerator or at room temperature. To serve warm, heat an individual piece briefly until just soft; avoid overheating, which can dry the edges and make the chocolate scorch.
Recipe Card
Servings: 16 brownies
Prep time: 20 minutes
Cook time: 24 to 30 minutes
Total time: About 3 hours, including cooling
Ingredients
- 6 oz semisweet chocolate, chopped; use 4 oz for melting and 2 oz for folding in
- 1/2 cup unsalted butter, cut into pieces
- 1/4 cup unsweetened cocoa powder
- 1 cup granulated sugar
- 1/2 cup packed light brown sugar
- 2 large eggs, at room temperature
- 1 large egg yolk, at room temperature
- 1 tsp vanilla extract
- 3/4 cup all-purpose flour, spooned and leveled
- 1/2 tsp fine salt
Instructions
- Heat the oven to 350°F. Line and lightly grease an 8-inch square pan.
- Melt 4 oz chocolate with the butter. Stir in the cocoa and let the mixture cool until warm.
- Whisk both sugars with the eggs and yolk for 2 to 3 minutes, until thick and glossy.
- Whisk in the chocolate mixture and vanilla. Fold in the flour and salt just until combined, then fold in the remaining 2 oz chocolate.
- Spread the batter in the pan. Bake for 24 to 30 minutes, until the edges are set and a tester near the center has moist crumbs. The center should reach 160°F for egg safety.
- Cool completely, about 2 hours, before lifting out and slicing.
Frequently Asked Questions
Can I use only cocoa powder instead of melted chocolate?
This recipe is balanced for both cocoa and melted chocolate. Replacing the chocolate changes the fat, sugar, and moisture in the batter, so it is better to use a brownie recipe designed for cocoa alone rather than making a direct swap.
Can I use salted butter?
Yes. Use salted butter and reduce the added salt to a small pinch. Salt levels vary by brand, so the flavor may differ slightly from the version made with unsalted butter.
How do I know when fudgy brownies are done?
Look for set edges and a center that no longer appears liquid. A toothpick should carry moist crumbs, not wet batter. A clean toothpick usually means the brownies have baked past the fudgy stage. An instant-read thermometer can confirm the center reaches 160°F.
Why did my brownies sink in the middle?
A slight settling as brownies cool is normal. A pronounced dip can come from underbaking, opening the oven repeatedly, or adding too much air to the batter. Beat the eggs and sugars until glossy and thicker, not until they become very foamy, and let the center set before removing the pan.
Can I double the recipe?
Yes, but use a larger pan and expect the baking time to change. A deeper layer takes longer to bake through, so rely on the set edges, moist-crumb test, and center temperature rather than assuming the original timing will apply.
Can I make the batter ahead?
For the most reliable rise and crust, bake the batter soon after mixing. If you need to work ahead, measure the dry ingredients and chop the chocolate in advance, then mix and bake when ready.
Can I make these without nuts?
Yes. The recipe contains no nuts as written. If adding nuts, check the package for cross-contact information when that matters to anyone eating them.
How can I get neat brownie squares?
Cool the brownies completely, lift them out using the parchment, and use a sharp knife. Wipe the blade clean between cuts. A brief chill firms the chocolate and makes the edges especially tidy.