
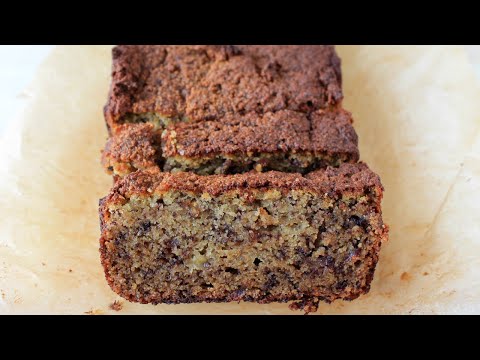
This gluten-free banana bread brings together ripe bananas, cocoa, chocolate, toasted-tasting macadamia nuts, and coconut in a tender, deeply flavored loaf. It’s a good way to turn spotty bananas into something more interesting than a plain quick bread, while keeping the method simple enough for a weekday bake.
The key is balancing the moist banana batter with a measured amount of gluten-free flour and letting the loaf cool before slicing. The result is soft and cocoa-rich, with sweet banana in the background and little crunchy, chewy pockets from the nuts, chocolate, and coconut.
Why This Recipe Works
Mashed banana supplies moisture and sweetness, but too much can leave a quick bread gummy in the center. This recipe uses enough banana to make the loaf tender without relying on banana alone for structure. Measuring the mashed fruit, rather than counting bananas only, helps account for their different sizes.
Cocoa absorbs some of the batter’s moisture, so it is paired with oil and eggs to keep the crumb soft. The eggs help bind the gluten-free flour and give the loaf structure; the oil stays fluid when cool, which helps the bread remain tender after it has been stored.
A gluten-free all-purpose flour blend is more dependable here than a single gluten-free flour, because blends combine flours and starches for a more balanced texture. Mixing the dry ingredients first distributes the cocoa and leaveners evenly, while folding in the nuts, chocolate, and coconut at the end keeps the batter from becoming overworked or streaky.
Finally, a moderate oven temperature gives the middle time to bake through before the top gets too dark. A short rest in the pan helps the loaf set; cooling it fully before slicing makes cleaner pieces and gives the moist crumb time to firm up.
Ingredients
- 1 3/4 cups gluten-free all-purpose flour blend, preferably one that contains xanthan gum
- 1/2 cup unsweetened cocoa powder
- 1 teaspoon baking soda
- 1/2 teaspoon baking powder
- 1/2 teaspoon fine salt
- 3 ripe medium bananas, mashed to make about 1 1/4 cups
- 2 large eggs, at room temperature if convenient
- 1/2 cup packed light brown sugar
- 1/3 cup neutral oil, such as canola or sunflower oil
- 1 teaspoon vanilla extract
- 1/2 cup macadamia nuts, roughly chopped
- 1/2 cup semisweet chocolate chips or chopped chocolate
- 1/3 cup unsweetened shredded coconut
Ingredient Notes
Bananas: Use ripe bananas with plenty of brown spotting; they mash easily and bring more sweetness and pronounced banana flavor than firm, yellow fruit. Measure the mashed amount because very large bananas can add excess moisture. If you have only two bananas, make up the difference with mashed ripe plantain only if you know its flavor suits you; applesauce is not a perfect swap and can make the loaf softer.
Gluten-free flour: Choose an all-purpose baking blend, not a single flour such as almond flour or coconut flour. Those behave differently and cannot be substituted cup for cup here. If your blend does not include xanthan gum or another binder, add 1/2 teaspoon xanthan gum to the dry ingredients. Check that the flour, cocoa, chocolate, and other packaged ingredients are labeled gluten-free if that matters for your cooking needs.
Cocoa and chocolate: Use unsweetened cocoa powder, not sweetened hot chocolate mix. Natural cocoa gives a direct, slightly sharper cocoa taste; Dutch-process cocoa is also suitable and tends to taste rounder. Semisweet chips keep the loaf from becoming overly sweet, while chopped chocolate gives irregular pockets. Milk chocolate works if you prefer a sweeter result.
Macadamias and coconut: Macadamias add a buttery crunch. Chop them into small pieces so they distribute through the loaf and are easy to cut through. Unsweetened shredded coconut gives a light chew without adding much extra sweetness. Sweetened coconut can be used, but the bread will taste sweeter and may brown more quickly on top.
Oil, eggs, and sugar: A neutral oil lets the banana, cocoa, and nuts lead. Melted butter can replace the oil for a richer flavor, though the cooled loaf may feel a little firmer. The eggs bind the batter; flax eggs are not a guaranteed one-for-one replacement in this moist gluten-free loaf. Brown sugar adds a mild caramel note, and coconut sugar can replace it by volume, with a less familiar flavor and a slightly different texture.
Instructions
- Set a rack in the center of the oven and heat it to 350°F. Grease a 9-by-5-inch loaf pan and line it with a strip of parchment, leaving overhang on the long sides. The parchment makes it easier to lift the tender loaf out intact.
- In a medium bowl, whisk together the gluten-free flour, cocoa powder, baking soda, baking powder, and salt until the cocoa is evenly distributed and no dark clumps remain. Breaking up cocoa lumps now avoids dry pockets in the baked bread.
- In a large bowl, mash the bananas until mostly smooth, leaving only a few small soft pieces. Whisk in the eggs, brown sugar, oil, and vanilla until the mixture looks even and glossy. If the bananas are still lumpy in large chunks, mash them further so the batter bakes uniformly.
- Add the dry mixture to the banana mixture. Fold with a spatula just until no dry flour is visible; the batter will be thick. Scrape the bottom and sides of the bowl, but stop once combined, since vigorous mixing can make a gluten-free quick bread dense.
- Fold in the macadamias, chocolate, and coconut, keeping a small pinch of each aside if you want to decorate the top. The additions should be spread throughout rather than gathered in one spot. Scrape the batter into the prepared pan and level it gently; scatter the reserved pieces over the surface if using.
- Bake for 55 to 65 minutes. The top should be set and slightly cracked, and a tester inserted in a cake-only part of the center should come out with a few moist crumbs rather than wet batter. Melted chocolate on the tester can look like uncooked batter, so test in another spot. If using an instant-read thermometer, aim for about 200°F to 205°F in the center, avoiding a chocolate pocket.
- If the top is getting dark before the middle is ready, lay a loose piece of foil over it for the remaining bake. When the loaf is done, let it rest in the pan for 15 minutes, then lift it onto a rack. Cooling on a rack prevents steam from collecting underneath and softening the bottom.
- Cool completely before slicing, usually about 2 hours. The crumb is fragile while warm, and the chocolate is still soft; waiting gives the loaf time to set and makes neater slices.
Yield: one loaf, about ten slices. Prep time: 15 minutes. Cook time: 55 to 65 minutes. Total time: about 1 hour 15 minutes to 1 hour 20 minutes, plus cooling.
Tips for Success
- Measure flour by spooning and leveling. Fluff the flour in its container, spoon it into the measuring cup, and sweep the top level. Scooping directly can pack in extra flour and make the loaf dry or heavy.
- Use bananas that are ripe, not spoiled. Brown spots are welcome, but discard fruit with mold or an unpleasant smell. If the bananas are still firm, mash them thoroughly and expect a less pronounced banana flavor.
- Bring cold eggs closer to room temperature if you can. They blend more readily with the oil and banana. If you are short on time, use them cold; just whisk the wet ingredients until they look cohesive.
- Keep the mix-ins modestly sized. Large nut pieces can make slices crumble around them. Roughly chopped nuts and ordinary chocolate chips distribute more evenly.
- Use the center, not the edges, to judge doneness. The edges bake first. A tester should go into a section without a chocolate chip, and the center should no longer look shiny or wet.
- Let the loaf cool before wrapping. Wrapping warm bread traps steam, which can make its surface damp. Wait until it is fully cool, then store it covered.
Troubleshooting
The middle is gummy: The loaf may need more baking time, or the bananas may have contributed more moisture than expected. Check the center with a tester away from chocolate, and continue baking in short intervals if wet batter clings to it. Next time, measure the mashed banana and make sure the oven is fully heated before the pan goes in.
The loaf is dry or crumbly: Too much flour, overbaking, or a flour blend without a binder can all contribute. Spoon and level the flour, check that the blend is suitable for baking, and use the center-doneness cues rather than baking well past them. If the blend contains no binder, include xanthan gum as noted above.
The top is done but the center is not: Cover the top loosely with foil and keep baking until the center is set. Oven performance and pan material can affect timing, so rely on the loaf’s cues rather than the clock alone.
The bread sinks after baking: A center that was underbaked, too much banana, or opening the oven door repeatedly can leave the structure weak. Measure the mashed fruit, avoid disturbing the loaf early in baking, and check the center before taking it out.
The slices fall apart: Warm banana bread is delicate, especially with gluten-free flour. Let it cool completely, use a sharp serrated knife, and wipe the blade between slices if melted chocolate smears across the cut.
The flavor seems bitter: Confirm that you used unsweetened cocoa in the listed amount rather than a more concentrated chocolate product, and check that the baking soda was measured accurately. A small change in cocoa type is fine, but adding extra cocoa can overwhelm the banana and sugar.
Variations
For a more pronounced coconut flavor, use lightly toasted coconut as a topping, but keep an eye on it because exposed coconut browns faster than the loaf itself. Toast it separately in a dry pan over low heat, stirring until pale golden, then cool it before scattering it over the baked bread.
For a less sweet loaf, use dark chocolate with a higher cocoa taste and unsweetened coconut. For a sweeter, dessert-like version, use milk chocolate and sweetened coconut, knowing the top may color sooner. You can also leave out the chocolate and increase the macadamias slightly, though the loaf will no longer have the same chocolate pockets.
To make muffins, divide the batter among lined muffin wells, filling each about two-thirds full. Bake at 350°F and begin checking around 20 minutes; they are ready when the tops spring back lightly and a tester in the center comes out without wet batter. Muffins cool faster than a loaf, so check them early to avoid drying them out.
For a nut-free option, omit the macadamias and use additional chocolate chips or pumpkin seeds if seeds are suitable for your table. For a dairy-free loaf, choose dairy-free chocolate and use oil rather than butter. Always check package labels when avoiding an ingredient or preventing cross-contact.
What to Serve With It
A slice is satisfying on its own, but it also works with plain yogurt, a spoonful of nut butter, or fresh fruit. For breakfast, serve it with eggs or another savory side to balance the sweetness. For an afternoon snack, coffee, black tea, or a glass of milk makes an easy pairing.
If serving it as dessert, warm a slice briefly and add a spoonful of yogurt or a small scoop of vanilla ice cream. The chocolate softens as the bread warms, so use a low setting and stop as soon as the slice is pleasantly warm rather than hot.
Make-Ahead, Storage and Reheating
You can bake the loaf a day ahead; its flavor remains full, and the crumb is easier to slice once it has cooled and rested. Keep it covered at room temperature only if you will finish it within a day or two and your kitchen is cool. For longer storage, refrigerate it promptly in an airtight container. As a cooked leftover, it should be refrigerated within two hours and used within three to four days.
To freeze, cool the loaf completely. Freeze it whole or cut it into slices, with parchment between slices so you can take out only what you need. Wrap it well and place it in a freezer-safe container or bag; use within three to four months for best quality. Thaw wrapped slices in the refrigerator or at room temperature, and avoid leaving them out for extended periods.
Reheat an individual slice in the microwave for a few seconds at a time, just until warm, or place it in a low oven until heated through. A toaster oven can crisp the cut surface, but watch closely because the chocolate may soften and the coconut can darken. If the loaf was frozen, thaw it before reheating for more even warming.
Frequently Asked Questions
Can I make this without a stand mixer?
Yes. A bowl, whisk, and spatula are all you need. Mash the bananas by hand, whisk the wet ingredients until cohesive, and fold in the dry ingredients gently.
Can I use frozen bananas?
Yes. Thaw them completely and drain off excess liquid before mashing. Measure the mashed fruit after draining; too much free liquid can make the center slow to bake and the crumb gummy.
Do I need to toast the macadamia nuts first?
No. They will bake in the batter as written. Toasting them beforehand is optional and gives a more pronounced nut flavor; cool them before folding them in so they do not warm the batter.
Can I use a different loaf pan?
A different size changes how quickly the center bakes. A wider pan makes a shorter loaf that may bake sooner, while a smaller pan makes a taller loaf that may need longer. Fill the pan no more than about two-thirds full; bake extra batter separately rather than overfilling.
How can I tell whether the bread is done without a thermometer?
Look for a set, slightly cracked top and test the middle in a spot without chocolate. A few moist crumbs are fine; wet batter is not. If the tester has melted chocolate on it, check another spot before deciding.
Can I reduce the sugar?
You can reduce the brown sugar modestly, but it contributes sweetness, moisture, and tenderness, so a large reduction changes the loaf. Very ripe bananas help keep the banana flavor prominent, but they do not make the bread taste identical to the original amount of sugar.
Is this recipe suitable for someone avoiding gluten?
It uses gluten-free flour, but the finished loaf is only as suitable as the ingredients and handling practices used. Check labels on the flour, cocoa, chocolate, and other packaged ingredients, and prevent contact with gluten-containing foods if needed.