
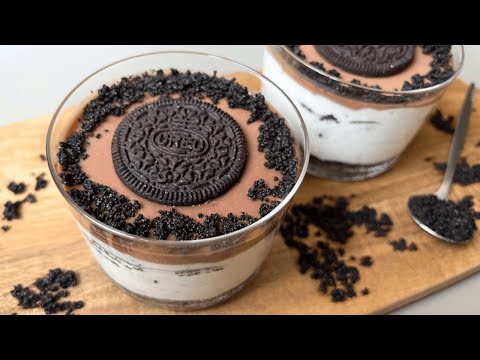
These no-bake Oreo cheesecake cups layer a buttery crushed-cookie base with a cool, creamy filling and more Oreos on top. They’re portioned in individual glasses, so there’s no slicing or baking involved.
The filling gets its light texture from whipped cream folded into softened cream cheese, while powdered sugar sweetens it without a grainy finish. Expect a smooth, tangy cheesecake layer balanced by crisp chocolate cookies and an optional ribbon of chocolate syrup.
Why This Recipe Works
A good no-bake cheesecake filling needs both structure and lightness. Softened cream cheese provides the rich, tangy base; whipping the cold cream separately traps air and gives the filling a softer texture. Folding the cream in gently keeps that air in the mixture instead of deflating it with vigorous mixing.
The cookie base uses melted butter to bind the crumbs. Pressing it firmly into the bottoms of the cups helps it hold together when you scoop into the dessert. Since the cups are served with a spoon, the crust does not need to be as firm as a baked cheesecake crust, but it should still be compact rather than loose and sandy.
Chilling gives the filling time to firm up and lets the flavors settle together. The finished texture is creamy and spoonable, not as dense as a baked cheesecake. Individual portions also make it easy to prepare ahead and add toppings just before serving.
Ingredients
- 24 Oreo cookies, finely crushed, for the base
- 1/4 cup unsalted butter, melted
- 16 oz cream cheese, softened
- 1 cup powdered sugar
- 1 teaspoon vanilla extract
- 1 cup heavy whipping cream, cold
- 4 Oreo cookies, crushed, for topping
- 2 tablespoons chocolate syrup, optional, for drizzling
Ingredient Notes
Oreo cookies: Crush the whole cookies, filling included. The filling contributes sweetness and helps the crumbs bind. For a fine, even base, pulse the cookies in a food processor or seal them in a sturdy bag and crush them with a rolling pin. Leave the topping crumbs a little chunkier if you like more texture.
Unsalted butter: Butter holds the base together and adds richness. If you have salted butter, it can stand in; the finished crust may taste slightly saltier. Melt the butter and let it cool briefly before mixing so it does not make the crumbs greasy or warm the serving cups.
Cream cheese: Use block-style cream cheese, softened until it yields to a gentle press. It blends more reliably into a smooth filling than very soft spreadable cream cheese. Full-fat cream cheese gives the filling its richest texture. Reduced-fat cream cheese may work, but the filling can be softer. Let it soften at room temperature only until pliable, rather than leaving it out for an extended period.
Powdered sugar: This dissolves readily into the cream cheese and keeps the filling smooth. Granulated sugar is not an ideal direct substitute because it can leave a gritty texture. If the powdered sugar is lumpy, sift it before mixing.
Vanilla extract: Vanilla rounds out the tang of the cream cheese and complements the chocolate cookies. Use pure or imitation vanilla according to what you have; the flavor will vary slightly.
Heavy whipping cream: Keep it cold so it whips into stable peaks. Heavy cream and heavy whipping cream both work. A lower-fat cream may not whip or hold its shape as well, so it is not a dependable swap for this filling.
Toppings: Extra cookie crumbs add crunch and make the layers easy to identify. Chocolate syrup is optional; add it just before serving so it stays distinct rather than sinking into the filling during a long chill.
Instructions
- Prepare the cups and crumbs. Set out 8 small dessert cups or glasses. Crush the 24 cookies for the base into fine, even crumbs, then melt the butter and let it cool briefly. The crumbs should look uniform, with no large cookie pieces, so the crust presses together evenly.
- Make the cookie base. Stir the melted butter into the fine crumbs until they are evenly moistened and resemble damp sand. Divide the mixture among the cups and press it firmly into each bottom with the back of a spoon. A compact layer should hold together when pressed; loose crumbs need a little more pressure. Set the cups aside while you make the filling.
- Beat the cream cheese mixture. In a mixing bowl, beat the softened cream cheese on medium speed until smooth, scraping the bowl as needed. Add the powdered sugar and vanilla, then beat on low until the sugar is incorporated before briefly mixing until creamy. The mixture should have no visible lumps. Starting slowly helps keep powdered sugar from puffing out of the bowl.
- Whip the cream. In a separate, clean bowl, whip the cold heavy cream until it forms medium-stiff peaks. Lift the beaters: the peak should hold its shape, with only the tip bending slightly. Stop before the cream looks grainy or begins to separate; overwhipped cream can make the filling lumpy.
- Fold the filling together. Add about one-third of the whipped cream to the cream cheese mixture and stir gently to loosen it. Add the remaining cream in two additions, folding with a spatula until no broad streaks remain. The mixture should look airy and evenly blended. Avoid beating at this stage, which can knock out the air you worked into the cream.
- Fill and chill. Spoon or pipe the filling over the crusts, dividing it evenly among the cups. Smooth the tops or leave soft swirls. Cover the cups and refrigerate at 40°F or colder for at least 4 hours, until the filling feels set when gently touched and holds a spoonful rather than flowing. Longer chilling, including overnight, gives the cups a firmer texture.
- Finish and serve. Add the reserved crushed Oreos shortly before serving, then drizzle with chocolate syrup if desired. The topping should remain crisp, and the filling should be cold and softly set. Serve straight from the refrigerator.
Servings: 8; prep time: 20 minutes; cook time: 0 minutes; chill time: 4 hours; total time: 4 hours 20 minutes.
Tips for Success
- Soften the cream cheese evenly. If the center is still cold and firm, it can leave small lumps even after mixing. Cut it into smaller pieces so it softens more evenly, and check that it is pliable before you start.
- Keep the whipping cream cold. Cold cream whips more readily and is less likely to turn soft before it reaches the right texture. If your kitchen is warm, chill the bowl and beaters briefly before whipping.
- Use a gentle folding motion. Sweep the spatula down through the center, along the bottom, and back over the top while turning the bowl. Stop once the filling is uniform; a few small streaks are easier to blend with one careful fold than with prolonged mixing.
- Press the crust, but do not overpack it. A firmly pressed base gives each cup a distinct cookie layer. Pressing extremely hard can make the crust dense and difficult to scoop, especially when it is cold.
- Leave room for the topping. Do not fill the glasses right to the rim. A little space makes the cups neater to cover and leaves room for crumbs or syrup.
- Chill before decorating. The filling needs time in the refrigerator to firm. Adding crumbs early can soften them, and syrup can streak through the top while the cups are being moved or covered.
- Use a piping bag for tidy layers. A piping bag or a zip-top bag with a corner snipped off makes it easier to fill narrow glasses without smearing the sides. A spoon works just as well if appearance is not a concern.
Troubleshooting
The filling is lumpy. The cream cheese was probably too cold, or the powdered sugar was not incorporated smoothly. Beat the cream cheese by itself until it is completely smooth before adding the other ingredients. If you notice lumps before folding in the whipped cream, scrape the bowl and beat the cream cheese mixture again. Once the whipped cream is folded in, avoid aggressive beating; it can deflate the filling.
The filling is too loose after chilling. It may need more time in the refrigerator, particularly if the cups are deep or the filling was warm when assembled. Give it additional chilling time before serving. If it still will not hold a spoonful, the cream may have been underwhipped or the cream cheese may have been a soft, spreadable type. The cups will still taste good, but the texture will be more like a mousse.
The whipped cream will not hold peaks. Check that the cream is cold and that the bowl and beaters are clean. Continue whipping in short intervals and watch closely. If it has become grainy, it is overwhipped; stop rather than trying to fold it into the filling. Cream that has separated cannot be restored to a smooth whipped texture for this recipe.
The crust falls apart. The crumbs may not have been evenly coated with butter, or they may not have been pressed firmly enough. Stir the crumb mixture thoroughly before dividing it. If a portion looks dry, press it again with the back of a spoon. The base is meant to be crumbly when scooped, but it should not be loose before serving.
The dessert tastes too sweet. Oreo cookies and powdered sugar both contribute sweetness. Keep the optional syrup off, use a restrained amount of topping, and serve the cups well chilled. Do not reduce the powdered sugar substantially without expecting a softer or less balanced filling.
The topping has gone soft. Cookie crumbs absorb moisture over time. Add them close to serving, rather than before storing the cups. If the cups are already topped, they will still be enjoyable, but the cookie pieces will have less crunch.
Variations
Make a chocolate-forward version. Fold a small handful of chopped chocolate into the finished filling, or use chocolate syrup on top. Keep additions modest so the filling stays light and the cups remain easy to scoop.
Add a contrasting topping. Try fresh sliced strawberries, raspberries, or a few chocolate shavings in place of some of the cookie crumbs. Add fresh fruit just before serving because it releases moisture as it sits.
Make a mint variation. A little peppermint extract can replace part of the vanilla. It is concentrated, so add it sparingly and taste the cream cheese mixture before folding in the whipped cream. Crushed mint chocolate cookies can replace the topping Oreos.
Serve it as one dessert. Instead of individual cups, press the crumb mixture into the bottom of a small serving dish and spread the filling over it. Chill until set, then spoon portions onto plates. The dessert will be softer than a baked cheesecake and is best served with a spoon.
Change the cookie layer. Chocolate sandwich cookies with a similar cream filling are the closest substitute. Other crisp chocolate cookies can work, though the crust may need a little adjustment in butter because cookie size and dryness vary.
What to Serve With It
These cups are rich, so a simple accompaniment works well. Serve them after a light meal with coffee, tea, or cold milk. Fresh berries add a tart contrast, while extra chocolate syrup or a few chocolate shavings suit anyone who wants a more decadent finish.
For a dessert spread, place the cups alongside fruit or lighter cookies rather than adding several other rich desserts. Keep the cups chilled until it is time to serve, and let guests add syrup at the table if you want the topping to stay neat.
Make-Ahead, Storage and Reheating
Make the cups ahead and refrigerate them, covered, until serving. They need at least four hours to set and can be prepared the day before. For the crispest topping, store the crushed Oreos separately and add them just before serving. Keep the chocolate syrup separate as well if you want a clean drizzle.
Because the filling contains cream cheese and whipped cream, keep the cups refrigerated at or below forty degrees Fahrenheit. Refrigerate them promptly and do not leave them at room temperature for more than two hours, or more than one hour if the room is above ninety degrees Fahrenheit. Discard cups that have been left out longer than those limits.
Covered leftovers keep in the refrigerator for three to four days. The crust and topping soften as they sit, but the dessert remains spoonable. If the cups have fruit on top, the fruit may soften sooner, so add it only to the portions you plan to serve.
For longer storage, freeze the cups without fresh fruit or syrup, in freezer-safe covered containers, for up to two months for best texture. The filling may become slightly less silky after thawing. Thaw in the refrigerator, not on the counter, and add fresh cookie crumbs or syrup after thawing. Do not reheat these cups; they are intended to be served cold.
Frequently Asked Questions
Do I need to bake the Oreo crust?
No. The melted butter binds the crumbs, and chilling firms the base enough for a spoonable dessert. There is no oven step for this recipe.
How long do the cups need to chill?
Allow at least four hours in the refrigerator. The filling should feel set and hold its shape on a spoon. If you have time, an overnight chill makes it easier to prepare dessert ahead.
Can I make these without a mixer?
Yes, though the cream cheese mixture takes more effort by hand. Use a sturdy whisk or wooden spoon and make sure the cream cheese is very soft before mixing. A hand mixer or stand mixer makes it easier to whip the cream to stable peaks; if whipping by hand, use a chilled bowl and whisk steadily.
Can I use whipped topping instead of heavy cream?
It changes the flavor and texture, and the filling may set differently. This recipe is written for heavy whipping cream, which you whip separately and fold into the cream cheese. If you substitute a prepared topping, follow its package guidance and expect a sweeter, less cream-forward result.
Can I use low-fat or spreadable cream cheese?
It may work, but the filling is more likely to be soft. Block-style cream cheese is the more reliable choice for a filling that holds its shape after chilling. If using a softer product, chill the cups thoroughly and expect a looser texture.
Can I make the filling ahead?
It is easiest to assemble the cups and chill them as a finished dessert. Whipped cream can lose some of its volume if it sits on its own, and the filling is easier to portion before it firms. Add the final cookie crumbs and syrup just before serving.
Can I use a different kind of cookie?
Yes. Choose a crisp chocolate sandwich cookie for a similar flavor and crumb. A plain crisp chocolate cookie also works, but it may make a less sweet base because it lacks the cream filling.
Why is my crust soft after storage?
Moisture from the filling gradually softens the cookie crumbs, especially where the crust touches the filling. This is normal for a chilled, no-bake dessert. For the best contrast, serve within a few days and add the topping shortly before serving.