
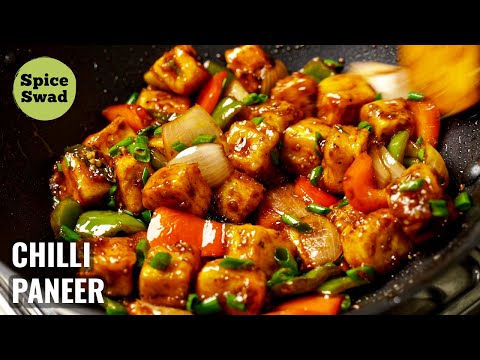
Paneer chilli is a popular Indo-Chinese-style dish of crisp paneer tossed with onion, bell pepper, green chilies, and a glossy, savory sauce. This version is made for a home stove: coat and shallow-fry the paneer, then stir-fry the vegetables quickly so they stay lively rather than soft.
The result is salty, tangy, gently sweet, and as spicy as you choose to make it. The coating gives the paneer crisp edges, while adding the sauce at the end helps keep those edges from turning soggy before the dish reaches the table. Serve it as a main with rice or noodles, or as a shareable starter.
Why This Recipe Works
A light coating of cornstarch and all-purpose flour gives the paneer a crisp outside without requiring a deep fryer. Cornstarch helps form a dry, delicate crust; flour makes the coating a little more substantial. A small amount of water binds the mixture to the cubes, and shallow-frying in batches gives them room to brown. Crowding the pan lowers the oil temperature and encourages steaming, so the crust can turn pale and soft.
The vegetables cook separately from the paneer and briefly over high heat. That keeps the onion and bell pepper tender-crisp, with a little bite and some browned edges. The sauce is mixed before it goes into the pan, so it can be poured in and reduced quickly instead of leaving the vegetables to overcook while you measure ingredients.
Finally, the paneer joins the sauce only at the end. Tossing it just long enough to coat gives you the best contrast between crisp edges and a juicy, seasoned center. For a saucier, gravy-style dish, add more water and thicken it with a cornstarch slurry; for this dry-style version, use only a few tablespoons of water.
Ingredients
- 200 g paneer, cut into roughly 2 cm cubes
- 1/2 cup cornstarch
- 1/4 cup all-purpose flour
- 1 tsp ginger-garlic paste
- 1 tsp red chili powder
- 1 tsp soy sauce, for the paneer coating
- 2 tbsp water, plus 1 tbsp more if needed to make the coating
- 1/2 cup neutral oil, approximately, for shallow-frying; the amount used will depend on your pan
- 2 tbsp neutral oil, for stir-frying
- 1 medium onion, about 1 cup, diced
- 1 medium bell pepper, about 1 cup, diced
- 2-3 green chilies, slit lengthwise
- 2 tbsp soy sauce, for the stir-fry sauce
- 1 tbsp chili sauce
- 1 tbsp tomato ketchup
- 1 tbsp rice vinegar or white vinegar
- 1 tsp sugar
- 3 tbsp water, for the stir-fry sauce
- 1/4 tsp ground black pepper
- 1/4 tsp fine salt, or to taste
- 2 tbsp sliced scallions, for serving
Ingredient Notes
Paneer: Use firm, fresh paneer that holds its shape when cut. If it feels dry or particularly firm, soak the cubes in warm water for 10 minutes, then drain and pat them thoroughly dry before coating. That short soak can soften the interior; drying matters because wet paneer makes the coating slide off. If paneer is unavailable, firm tofu is the closest easy substitute. Press it first to remove excess water and handle it gently.
Cornstarch and flour: Together they make a coating that can crisp in a shallow layer of oil. Potato starch can replace cornstarch by volume. If you need a gluten-free dish, use a gluten-free flour blend in place of all-purpose flour and check that the soy sauce and chili sauce are labeled gluten-free; regular soy sauce and many bottled sauces contain wheat.
Ginger-garlic paste and red chili powder: The paste seasons the coating and adds warmth; finely grated ginger and garlic can replace it in equal parts. Red chili powder varies in heat. Use a mild ground red pepper if you want color without as much heat, or reduce the amount to 1/2 teaspoon. The green chilies bring a fresher, sharper heat, so remove their seeds or use fewer for a milder dish.
Soy sauce, chili sauce, and ketchup: Soy sauce supplies salt and savory depth, while chili sauce adds heat and ketchup rounds the sauce with sweetness and tang. Use low-sodium soy sauce if you prefer, then adjust salt at the end. If you do not have chili sauce, use a little extra red chili powder and add it with the vegetables. Ketchup is optional; use an extra teaspoon of sugar and a little more vinegar if leaving it out, then taste before adding more.
Vinegar and oil: Vinegar brightens the sauce and balances its salty and sweet notes. Rice vinegar is mild; white vinegar is sharper, so start with 2 teaspoons if using white vinegar and add more to taste. Use a neutral oil such as canola, sunflower, or peanut oil for frying and stir-frying. The frying-oil amount is an estimate: the pan needs enough to come about 1 cm up its sides, not enough to submerge the paneer.
Instructions
- Prepare the paneer and coating. Pat the paneer dry. In a medium bowl, whisk together the cornstarch, flour, ginger-garlic paste, red chili powder, 1 teaspoon soy sauce, and 2 tablespoons water. Add another tablespoon of water only if needed. The mixture should be thick enough to cling to the cubes, not runny like pancake batter. Fold in the paneer gently until each piece is coated. A thick, even layer helps form a crust instead of leaving bare patches.
- Mix the sauce before you start frying. In a small bowl, stir together the 2 tablespoons soy sauce, chili sauce, ketchup, vinegar, sugar, 3 tablespoons water, black pepper, and salt. Set it beside the stove. The sauce should taste a little more intense than you want the finished dish to taste, since it will be spread over the paneer and vegetables. Having it ready lets you work quickly once the pan is hot.
- Shallow-fry the paneer. Pour about 1 cm of neutral oil into a wide skillet and heat over medium to medium-high heat until it reaches about 350°F (175°C). If you do not have a thermometer, test with a small dab of coating: it should sizzle promptly and rise to the surface, but not darken immediately. Carefully add paneer in one layer, leaving space between pieces. Fry for about 2-3 minutes per side, turning once or twice, until the coating is golden and crisp. Work in batches; the oil should keep sizzling around the pieces. Move the paneer to a wire rack or paper-towel-lined plate. The rack helps keep the underside from steaming.
- Stir-fry the vegetables. Carefully pour off the frying oil and wipe out the skillet if there are loose bits of coating. Add 2 tablespoons fresh neutral oil and heat over high heat until it shimmers, about 1 minute. Add the onion, bell pepper, and slit green chilies. Stir-fry for 2-3 minutes, stirring or tossing frequently. Look for a little color on some edges while the vegetables still hold their shape. This quick cooking gives the dish texture; cooking them until soft can make the finished sauce watery.
- Add and reduce the sauce. Pour the prepared sauce into the skillet and stir for 30-60 seconds. It should bubble and lightly coat the vegetables, with no watery pool left at the bottom. If it reduces too far or the pan looks dry, stir in 1 tablespoon water. Taste a piece of bell pepper and adjust salt, vinegar, or chili sauce now. Adding these seasonings before the paneer makes it easier to correct the balance without handling the crisp cubes too much.
- Toss in the paneer and serve. Return the fried paneer to the pan and toss gently for about 30 seconds, just until it is hot and coated. Avoid simmering it in the sauce; prolonged cooking softens the crust and can make paneer chewy. Scatter over the sliced scallions and serve immediately, while the paneer is still crisp at the edges.
Serves: 3-4 as a main or 4 as a starter; prep time: 15 minutes; cook time: 20 minutes; total time: 35 minutes.
Tips for Success
- Dry the paneer well. Excess surface moisture thins the coating and can cause it to slide off. Blot all sides with a clean towel, especially if the paneer was soaked to soften it.
- Keep the coating thick enough to cling. Add water a teaspoon at a time if it is stiff and crumbly. If it runs off the cubes, mix in a little extra cornstarch and flour in equal parts.
- Fry in uncrowded batches. Space allows hot oil to circulate around each piece. If the coating stops sizzling when paneer goes in, wait for the oil to heat again before adding the next batch.
- Use a wide skillet for the final toss. More surface area helps the sauce reduce quickly and lets you turn the paneer without crushing it. A small pan traps steam and makes the vegetables soft.
- Cut the vegetables to similar sizes. Pieces around 2 cm cook at a similar pace. Keep the onion and pepper large enough to remain distinct after the quick stir-fry.
- Adjust heat in layers. Green chilies, chili sauce, and red chili powder each contribute heat. Start with fewer green chilies if unsure; you can add more chili sauce to the finished pan, but removing heat is difficult.
Troubleshooting
The coating falls off. The paneer may have been wet, or the batter may have been too thin. Pat the cubes dry before coating and aim for a thick layer that clings. Turn them carefully with a thin spatula or tongs rather than stirring them around in the oil.
The paneer is pale or soft. The oil may not have been hot enough, or too many pieces may have gone into the pan at once. Fry a smaller batch and let the oil return to about 350°F (175°C). If the paneer is already cooked, a brief second fry can crisp the outside, but watch closely so the coating does not burn.
The coating browns before the paneer is crisp. The oil may be too hot, or the pieces may be too large. Lower the heat slightly and check the next batch after 2 minutes. Aim for an even golden crust, not a deep brown one.
The sauce tastes too salty. Do not add more soy sauce. Stir in a tablespoon of water and a little extra ketchup or sugar, then taste again. If the whole dish is already combined, serve it with plain rice to balance the salty sauce.
The sauce is watery. Keep the paneer out and simmer the sauce and vegetables over high heat for another 30-60 seconds, stirring, until it lightly coats the pan. Then add the paneer. If you want a thicker, clingier finish, mix 1 teaspoon cornstarch with 1 tablespoon cold water and add a little at a time while the sauce bubbles.
The paneer turns chewy. Paneer can firm up if fried for too long or left simmering in sauce. Fry only until the coating is crisp and finish with a brief toss. For the next batch, make sure the oil is hot enough for the coating to brown promptly.
Variations
Make it drier and crispier: Reduce the sauce water to 1 tablespoon and toss the paneer in the pan for only a few seconds. This style is easiest to serve immediately.
Make it saucier: Add 1/2 cup water to the sauce ingredients. Once it simmers, thicken it with a slurry made from 2 teaspoons cornstarch and 2 tablespoons cold water. Stir the slurry before pouring it in, then simmer until glossy. Add the paneer just before serving so it does not sit in the gravy.
Make it milder: Use one green chili, remove its seeds, and reduce the red chili powder to 1/2 teaspoon. Keep the ginger, garlic, vinegar, and soy sauce so the dish still tastes rounded.
Add vegetables: Add 1 cup sliced cabbage, 1/2 cup sliced carrots, or 1 cup broccoli florets. Cut firm vegetables thinly and stir-fry them before the onion and pepper, or blanch broccoli briefly so it has time to become tender. Keep the pan uncrowded.
Use tofu instead: Substitute 200 g pressed firm tofu for paneer. Pat it dry and follow the same coating and frying method. Tofu is more fragile, so turn it gently and fry in smaller batches.
What to Serve With It
Serve paneer chilli over steamed basmati rice or plain long-grain rice when you want the sauce to be the focus. It also works with fried rice or noodles; choose a simply seasoned side so the meal does not become too salty. For a fuller dinner, add a quick cucumber salad or lightly cooked greens. If serving it as a starter, offer toothpicks and bring it to the table as soon as it is tossed, before the coating softens.
For a weeknight meal, you can cook rice while you prep and fry the paneer. Keep the sauce ingredients measured beside the stove and stir-fry the vegetables only when the rice is nearly ready. The final toss takes less than a minute, so it is best to time it for serving rather than making the dish well in advance.
Make-Ahead, Storage and Reheating
For the best texture, fry the paneer and stir-fry the vegetables just before eating. You can make the sauce mixture up to 2 days ahead and keep it covered in the refrigerator. You can also dice the vegetables a day ahead and refrigerate them in a sealed container. Keep the fried paneer separate from the sauce if you need to prepare it early; it will soften as it sits, but reheating in a hot oven or air fryer can restore some crispness.
Refrigerate leftovers promptly in a covered, shallow container and use within 3-4 days. Keep the refrigerator at 40°F (4°C) or below. Do not leave the dish at room temperature for more than 2 hours, or more than 1 hour when the temperature is above 90°F (32°C). For longer storage, freeze leftovers in a sealed freezer-safe container for about 3-4 months. The paneer and vegetables may become softer after thawing, so freezing is best when convenience matters more than crisp texture.
Reheat only the portion you plan to eat. Warm it in a skillet over medium heat with a splash of water, stirring gently until steaming hot throughout; for food-safety guidance, leftovers should reach 165°F (74°C). A microwave also works: cover loosely, heat in short intervals, and stir between intervals so it warms evenly. The coating will be less crisp after storage, but a few minutes in a 400°F (205°C) oven or air fryer can help dry and crisp the paneer again. Avoid repeatedly cooling and reheating the full batch.
Frequently Asked Questions
Can I make paneer chilli without deep-frying?
Yes. This recipe shallow-fries the paneer in a skillet rather than submerging it in oil. You can also use an air fryer: arrange coated cubes in a single layer, lightly brush or spray them with oil, and cook at 400°F (205°C), turning once, until golden and crisp, about 10-15 minutes depending on the appliance. Check early; air fryers vary, and the coating may brown unevenly.
Should I soak paneer before cooking?
Only if it is firm or dry. A 10-minute soak in warm water can make a firm block softer. Drain it well and pat it dry before coating. Soft, fresh paneer usually needs no soaking, and soaking it unnecessarily can make the coating harder to attach.
Can I prepare the paneer chilli ahead for a party?
You can prep the components ahead, but the finished dish is best freshly tossed. Mix the sauce and cut the vegetables in advance, then fry the paneer and cook the vegetables shortly before serving. If you must cook the paneer ahead, keep it separate and re-crisp it in a hot oven or air fryer before adding it to the sauce.
How do I make this recipe less spicy?
Use one green chili or leave them out, reduce the red chili powder, and choose a mild chili sauce. Keep the vinegar, soy, and a little ketchup for flavor. Taste the sauce before adding it to the pan; it is easier to increase the heat gradually than to correct an overly spicy dish.
Can I make it gluten-free?
Use a gluten-free flour blend instead of all-purpose flour and confirm that the soy sauce and chili sauce are gluten-free. Some soy sauces and bottled condiments contain wheat. Cornstarch is commonly gluten-free, but check the package if cross-contact is a concern.
Why is my paneer chilli not as crisp as restaurant-style versions?
The coating softens when it sits in sauce, and a home skillet may not have the same high heat or cooking space as a commercial burner. Fry in batches, reduce the sauce before adding the paneer, and toss only at the last moment. Serve immediately for the crispest result.
Can I use frozen paneer?
Thaw it completely in the refrigerator, then drain and pat it dry before cutting and coating. Frozen and thawed paneer can have a more porous or crumbly texture than fresh paneer, so turn the cubes gently and avoid vigorous stirring.