
A soda cracker pie crust is a crisp, buttery shell made by crushing crackers, mixing them with melted butter, and pressing the crumbs into a pie plate. It is a useful alternative to pastry when you want a simple crust with a little salty crunch.
This version keeps the ingredient list short and gives you a clear way to judge the texture before baking. The finished crust tastes buttery and lightly salty, with optional sugar adding a gentle sweetness for fruit, chocolate, or cream pies.
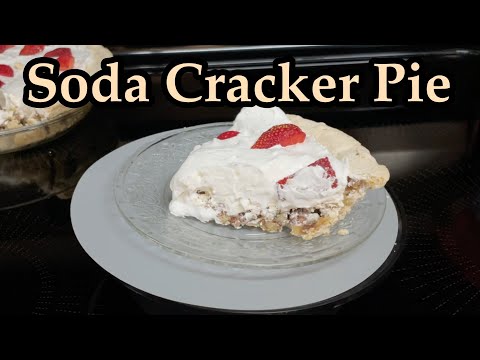
Why This Recipe Works
Fine, even crumbs are the foundation. Smaller crumbs pack together more closely than large shards, so the crust is less likely to crumble when you slice or serve it. A food processor makes quick work of the crackers; a rolling pin and a sturdy bag work just as well if you crush them thoroughly.
Melted butter coats the crumbs and helps them hold their shape as the crust bakes and cools. The mixture should feel like damp sand: it should clump when squeezed, but it should not look greasy or have butter pooling at the bottom of the bowl. Since cracker brands and crushing methods can produce slightly different crumb volumes, check the mixture by feel before pressing it into the plate.
A moderate oven temperature of 350°F warms the butter and sets the crumb layer without quickly darkening the edges. A short bake gives the shell enough structure for a chilled filling. If your filling will be baked in the crust, a shorter initial bake—or no initial bake, if the filling recipe specifies it—helps prevent the edges from getting too dark.
Ingredients
- 1 ½ cups finely crushed soda crackers, about 40–50 crackers, depending on size
- ½ cup unsalted butter, melted
- 2 tablespoons granulated sugar, optional, for sweet pies
- ¼ teaspoon salt, optional, depending on the saltiness of the crackers and filling
Ingredient Notes
Soda crackers: Use plain, crisp soda crackers. Crush them finely, then measure the crumbs; the number of whole crackers is an estimate because sizes and brands vary. A food processor gives consistent crumbs, while a rolling pin works if you break up any larger pieces before measuring. Flavored crackers can change the taste and salt level, so plain crackers are the most adaptable choice.
Unsalted butter: Butter binds the crumbs and brings a rounded, toasted flavor. Melt it and let it cool briefly so it is fluid but not very hot when mixed with the crackers. If you have salted butter, use it and leave out the optional salt. Butter substitutes do not always firm in the same way, so the finished crust may be more delicate.
Granulated sugar: Sugar is optional. Add it for sweet fillings such as fruit, chocolate, or custard; leave it out for savory pies or when you want the crackers’ salty character to stand out. Brown sugar can be used in the same amount for a slightly deeper flavor, though it may make the crumbs a little more moist.
Salt: Soda crackers are already salted, and some fillings are salty too. The optional ¼ teaspoon is most useful if your crackers taste mild and the filling is not strongly seasoned. When uncertain, omit it; you can always season the filling separately.
Instructions
- Heat the oven and prepare the plate. Set a rack in the center of the oven and preheat to 350°F. Have a 9-inch pie plate ready. A glass, ceramic, or metal plate works; avoid greasing it, since the butter in the crumbs supplies enough fat. Starting with a fully heated oven helps the crust bake evenly.
- Crush and measure the crackers. Crush the crackers into fine, fairly uniform crumbs, then measure 1 ½ cups into a mixing bowl. If using a food processor, pulse rather than running it continuously so you can stop before the crumbs become powdery. Pick out any large pieces; they can leave weak spots that break when the crust is cut.
- Mix the crumbs. Stir in the melted butter, sugar if using, and salt if using. Mix until the crumbs are evenly moistened. Pinch a little mixture between your fingers: it should hold together briefly. If it stays loose, stir thoroughly and press a test clump again before adding anything else; the butter often needs a moment to coat all the crumbs.
- Press the crust into the plate. Tip the mixture into the pie plate. Press it firmly and evenly across the bottom, then work it up the sides. Use the flat bottom of a measuring cup to compact the base and your fingertips to shape the sides. Aim for an even layer rather than a thick ridge at the rim; uneven thickness can bake at different rates.
- Bake the shell. For a crust that will hold a chilled or no-bake filling, bake at 350°F for 8–10 minutes. Look for a surface that appears set and feels dry rather than loose; the edges may become just faintly golden, but they should not be deeply browned. The short bake helps the butter-bound crumbs hold together.
- Cool before filling. Set the pie plate on a heat-safe rack and cool the crust completely, about 30 minutes. The crust firms as it cools, so do not judge its final crispness while it is hot. Adding a cool filling to a warm shell can soften the base and may affect a filling that needs to stay cold.
For a pie that will bake with its filling: Check the filling recipe before baking the crust. If it calls for a partially baked shell, bake this crust for about 5–7 minutes at 350°F, just until the crumbs look set, then add the filling and continue as directed. If the filling recipe specifies an unbaked crumb crust, follow that instruction instead. The crust can darken during a long filling bake, so shield the rim loosely with foil if it is browning faster than the center.
Tips for Success
- Measure after crushing. The cracker count is only a guide. Measuring 1 ½ cups of crumbs keeps the butter-to-crumb balance consistent.
- Check the texture before pressing. The crumbs should clump when squeezed. If they do not, first make sure the butter is mixed through; avoid adding extra butter automatically, which can make the base greasy.
- Make the crust an even thickness. Press the base and sides with similar firmness. A very thick bottom can feel heavy, while thin spots are more likely to crack or leak filling.
- Shape the rim with care. Keep the edge level and compact, but do not pile up a thick band of crumbs. If the rim looks loose, press it gently against the plate before baking.
- Choose sugar and salt for the filling. Sweet filling does not always require a sweet crust, and salty fillings may need no added salt. Decide based on the filling’s flavor rather than adding both automatically.
- Cool the shell fully. Let it set on a rack before filling. Moving or filling it while warm can disturb the crumb layer.
Troubleshooting
The crumbs will not hold together. Check that the butter was measured accurately and mixed through the crumbs. Crush any remaining large pieces and mix again. If the mixture still will not clump, add melted butter a teaspoon at a time, mixing and checking after each addition; different cracker crumbs can absorb butter differently.
The crust is greasy. Too much butter or a poor crumb-to-butter mix can leave visible grease. Next time, measure the crumbs after crushing and the butter carefully. For the current crust, blot any obvious surface butter before baking, and avoid adding more butter to a mixture that already clumps when squeezed.
The crust crumbles when sliced. It may have been pressed too lightly, the crumbs may have been too coarse, or it may not have cooled completely. Let it cool fully before filling and cutting. For the next batch, use finer crumbs and compact the mixture evenly, especially where the base meets the sides.
The edges are too dark. Oven temperatures and pie plates vary. Use the center rack, check at the early end of the baking range, and shorten the bake if the edges are coloring quickly. For a filled pie that bakes longer, shield the rim loosely with foil once it has reached a light golden color.
The bottom turns soft after filling. Some moist fillings soften crumb crusts as they sit. Make sure the shell is completely cool, and add the filling close to serving time when practical. For a filling that is baked in the shell, follow its instructions for an unbaked or partially baked crust rather than fully baking the crust first.
Variations
Sweet cracker crust: Add the 2 tablespoons of sugar for fruit, chocolate, or chilled cream fillings. Taste the crackers first and decide whether the optional salt belongs in the mix.
Less-sweet crust: Leave out the sugar. This lets the cracker flavor show through and works well with savory fillings or fillings that are already quite sweet.
Seasoned savory crust: Omit the sugar and use the optional salt only if needed. A small amount of dried herbs or finely grated hard cheese can be mixed into the crumbs for a savory pie, but additions may change how tightly the crust holds, so keep them modest.
Brown-sugar version: Replace the granulated sugar with 2 tablespoons of packed brown sugar. It gives the crust a mild molasses note that pairs with apple, pumpkin, or other warmly spiced fillings.
Different plate size: This quantity is intended for a 9-inch pie plate. A larger plate will make a thinner shell, and a smaller one may leave extra crumbs. Press any extra crumbs into the base rather than making the sides unusually thick.
What to Serve With It
This crust is a base, so choose a filling that suits its buttery, salty flavor. For a chilled pie, try chocolate, lemon, or a creamy filling; the crisp shell provides contrast to a smooth center. For a fruit pie, the optional sugar helps the crust sit comfortably alongside sweet or tart fruit. If using a filling that needs baking, follow that recipe’s directions for an unbaked or partially baked crust.
For a savory pie, omit the sugar and consider the salt level of both the crackers and filling. Egg-based, cheese, or vegetable fillings can work well, but the filling recipe should determine whether the shell is baked first and how long the finished pie cooks. Serve slices with a simple green salad or cooked vegetables if you want a fuller meal.
Make-Ahead, Storage and Reheating
Make ahead: Bake the unfilled crust, cool it completely, and store it covered. If you are preparing it a day ahead, keep it in a clean, airtight container in a cool, dry place. Add the filling only when the shell is cool and you are ready to assemble the pie.
Refrigerate: For longer storage, cover the cooled, unfilled crust and refrigerate it for 3–4 days. Keep it away from uncovered foods so it does not pick up odors. Once filled, storage depends on the filling: fillings that require refrigeration should be refrigerated promptly, generally within 2 hours, and used within 3–4 days. Follow the filling recipe if it gives a shorter storage time.
Freeze: Wrap the cooled, unfilled crust securely and freeze for up to 3–4 months for best quality. Thaw it in the refrigerator while still wrapped, then unwrap once thawed to limit condensation on the crust. A frozen crust may be a little less crisp after thawing, but it remains suitable for filling.
Refresh if needed: If a plain crust has softened, warm it in a 325°F oven for about 5–8 minutes, then cool it before filling. Watch closely; the edges can brown quickly. Do not reheat a filled pie this way unless its filling recipe calls for reheating.
Recipe Card
Yield: One 9-inch pie crust, suitable for about 8 slices of pie
Prep time: 15 minutes
Cook time: 10 minutes
Total time: About 55 minutes, including 30 minutes of cooling
Ingredients
- 1 ½ cups finely crushed soda crackers, about 40–50 crackers
- ½ cup unsalted butter, melted
- 2 tablespoons granulated sugar, optional for sweet pies
- ¼ teaspoon salt, optional
Condensed steps
- Heat the oven to 350°F. Crush the crackers finely and measure 1 ½ cups into a bowl.
- Mix in the melted butter and, if desired, the sugar and salt. The crumbs should clump when squeezed.
- Press the mixture firmly and evenly into the bottom and sides of a 9-inch pie plate.
- Bake 8–10 minutes for a chilled filling, until the surface looks set and the edges are only lightly colored. For a pie baked with its filling, use the filling recipe’s crust instructions; a partial bake is usually about 5–7 minutes.
- Cool completely, about 30 minutes, before adding a chilled filling.
Frequently Asked Questions
Can I make this crust without a food processor?
Yes. Put the crackers in a sturdy resealable bag, press out excess air, and crush them with a rolling pin. Work until the crumbs are fine and fairly even, then measure them. A few larger pieces can be crushed separately before mixing.
Do I have to bake the crust?
For a chilled or no-bake filling, baking helps set the butter and makes the shell sturdier. If a specific filling recipe calls for an unbaked crumb crust, follow that direction. A pie that bakes with its filling may need only a short partial bake or none at all.
Can I use salted butter?
Yes. Replace the unsalted butter with the same amount of salted butter and omit the optional salt. Soda crackers already contain salt, so tasting the crumbs before adding any extra is a sensible approach.
How do I keep the crust from sticking to the pie plate?
Usually no greasing is needed because the butter in the crumb mixture coats the plate. Press the crumbs evenly into the bottom and sides, and let the shell cool before removing or slicing it. A thin spatula can help loosen a slice if needed.
Can I use this crust for a baked pie?
Yes, but use the filling recipe’s directions for crumb crusts. For a partially baked shell, bake this crust for about 5–7 minutes at 350°F, just until set, then add the filling. A long bake with the filling can make the crust too dark, so protect the rim if it browns early.
Why does my crust feel soft instead of crisp?
It may not have baked long enough, may have been filled while warm, or may have softened from a moist filling. Bake until the surface looks set, cool fully, and add the filling as close to serving as practical. A brief 325°F refresh can help an unfilled crust regain some crispness.
Can I leave out both the sugar and salt?
Yes. Both are optional. Leaving them out gives you a simple buttery-cracker base, which is useful when the filling is already sweet or well seasoned.
Can I freeze the crust after adding filling?
That depends on the filling. Some fillings change texture when frozen, and others need particular thawing and storage instructions. Freeze the unfilled shell for the most dependable result, or follow a tested recipe’s directions for freezing the assembled pie.