
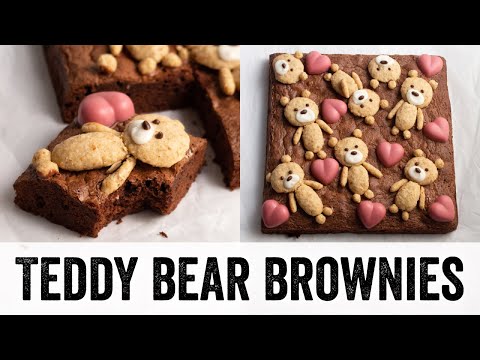
Teddy bear brownies are rich, chocolatey brownies cut into bear shapes after baking, so you get a playful treat without needing a special bear-shaped pan. A simple teddy bear cookie cutter turns one familiar brownie slab into a batch that works for birthdays, bake sales, holidays, or an ordinary afternoon.
This version uses melted butter and cocoa for a deep chocolate flavor, with just enough baking powder to give the brownies a little lift while keeping them sturdy enough to cut. The centers stay moist and fudgy, the edges are pleasantly chewy, and optional chocolate chips add extra pockets of chocolate.
Why This Recipe Works
Baking the batter in a lined rectangular pan gives it an even thickness, which matters when you want bear shapes that hold together. Parchment also makes it easy to lift the whole slab out before cutting, rather than trying to maneuver a cutter against the sides of the pan.
Mixing cocoa powder into warm melted butter helps it disperse smoothly and brings out its chocolate aroma. Once the eggs and sugar are added, whisking until the mixture looks glossy helps create a cohesive batter. After the flour goes in, gentle folding limits gluten development, which helps keep the brownies tender instead of tough.
Cooling is part of the cutting technique, not an optional wait. Warm brownies are soft and likely to smear or tear under the cutter. A fully cooled, briefly chilled slab cuts into cleaner shapes, and pressing the cutter straight down rather than twisting helps preserve the teddy bear outline.
Ingredients
- 1 cup unsalted butter
- 2 cups granulated sugar
- 4 large eggs
- 1 teaspoon vanilla extract
- 1 cup all-purpose flour
- 1 cup unsweetened cocoa powder
- 1 teaspoon baking powder
- 1/2 teaspoon salt
- 1 cup chocolate chips, optional
Equipment: 1 teddy bear-shaped cookie cutter, preferably about 3 inches wide; a 9-by-13-inch baking pan; parchment paper; and a wire rack.
Ingredient Notes
Butter: Unsalted butter lets you control the salt level. Melt it gently and let it cool briefly before mixing in the eggs. If you only have salted butter, use it and reduce the added salt to 1/4 teaspoon.
Sugar: Granulated sugar sweetens the cocoa and helps the surface develop a delicate sheen. Brown sugar can replace part of it, but it adds moisture and a caramel note, making the brownies softer and a little less crisp at the edges.
Eggs: Eggs bind the batter and give the brownies structure. Use large eggs at room temperature if convenient; they blend more easily into the butter mixture. Because eggs are important to the structure, egg-free swaps may change how well the shapes hold.
Cocoa powder: Unsweetened cocoa provides the main chocolate flavor. Natural cocoa works well here; Dutch-process cocoa is also usable, though the flavor and color may differ slightly. Do not use sweetened drinking cocoa as a direct replacement.
Flour and baking powder: Flour gives the slab enough structure for cutting, while a small amount of baking powder keeps it from becoming overly dense. Measure flour by spooning it into the cup and leveling the top rather than packing it down.
Chocolate chips: Chips are optional. They make the brownies more chocolate-forward, but large clusters can interrupt a clean cutter edge. For the neatest bears, use mini chips or leave them out.
Instructions
- Prepare the pan and oven. Heat the oven to 350°F. Line a 9-by-13-inch pan with parchment, leaving enough overhang to lift the baked slab out. Lightly grease the exposed sides if the parchment does not cover them. The paper keeps the brownies from sticking and makes it possible to cut shapes on a board.
- Melt the butter and mix in the cocoa. Melt the butter in a saucepan over low heat or in a microwave-safe bowl in short bursts. Let it cool until warm, not piping hot, then whisk in the cocoa until smooth. The mixture should look dark and glossy, with no dry cocoa pockets. Cooling it slightly helps keep the eggs from scrambling when they are added.
- Add sugar, eggs, and vanilla. Whisk in the sugar, then add the eggs one at a time, whisking after each addition. Stir in the vanilla. The batter should look thick, shiny, and evenly combined. There is no need to beat it until fluffy; excessive air can make the texture more cake-like.
- Fold in the dry ingredients. In a separate bowl, whisk together the flour, baking powder, and salt. Add them to the chocolate mixture and fold just until no streaks of flour remain. Fold in the chocolate chips, if using. Stop as soon as the batter is uniform so the brownies stay tender.
- Bake. Spread the batter evenly in the prepared pan and smooth the top. Bake at 350°F for 25 to 30 minutes. The edges should look set and the center should no longer look liquid. A toothpick inserted near the center should come out with moist crumbs rather than wet batter. For egg safety, check that the center reaches 160°F with an instant-read thermometer; avoid touching the pan with the probe. The brownies will firm as they cool.
- Cool the slab completely. Set the pan on a wire rack and cool for at least 1 1/2 hours. Lift the parchment and brownie slab onto a cutting board, then refrigerate for 30 minutes to make the surface firmer. The slab is ready when it feels cool throughout and the cutter can press through without dragging soft brownie behind it.
- Cut the bears. Lightly grease or wipe the cutter clean, then press it straight down into the slab. Lift it straight up; do not twist, since twisting can pull the bear’s ears and paws out of shape. Re-chill the slab briefly if it softens, and wipe the cutter between cuts for cleaner edges. Arrange the bears on a serving plate. Save the scraps for snacking, parfait layers, or a bowl of ice cream.
Tips for Success
- Use parchment with overhang on two sides. Those edges act as handles when the slab is ready to move.
- Keep the butter warm rather than hot when adding cocoa, and let the cocoa mixture cool a little more before adding eggs.
- Scrape the bowl as you fold in the dry ingredients, especially at the bottom where flour can hide.
- Spread batter into the corners and level the surface. An uneven slab makes some bears thinner than others.
- Choose a cutter with broad, simple outlines. Very narrow paws or sharp points are more likely to break when lifted.
- Press straight down with a firm, even motion. If the cutter sticks, wipe it and lightly grease it again rather than twisting.
- Cut the shapes close together to make the most of the slab, then use the scraps rather than trying to force a cutter through a cramped spot.
Troubleshooting
The brownies crumble when cut: They may still be warm, or the cutter may have a delicate outline. Cool the slab fully, chill it briefly, and use a straight-down press. If the edges still crumble, use a simpler cutter and save broken pieces as brownie bites.
The center seems too soft: Check that it is no longer liquid and reaches 160°F in the center. If it needs more time, return the pan to the oven in short increments and check again. The center will firm further as it cools, so do not wait for a dry toothpick.
The brownies are dry or cakey: They may have baked too long, or the flour may have been packed into the measuring cup. Next time, begin checking at the early end of the bake time and remove the pan when the center is set with moist crumbs.
The top is dull or the texture is tough: A dull top is not a problem for cutting, but tough brownies often come from overmixing after adding flour. Fold only until the dry streaks disappear.
The bear shapes stick to the cutter: Wipe the cutter after each cut and apply a very thin film of neutral oil if needed. Chilling the slab again also helps release each shape cleanly.
Variations
Extra-chocolate bears: Keep the optional chocolate chips, or scatter a few over the batter and gently press them in before baking. Mini chips are less likely to interfere with the cutter.
Nutty brownies: Fold in a small handful of chopped walnuts or pecans. Keep pieces small so they do not snag the cutter or make the bear shapes crumble.
Mint-chocolate version: Replace the vanilla with peppermint extract, using a light hand because peppermint can quickly dominate. Chocolate chips pair naturally with this variation.
Decorated teddy faces: Once the brownies are cool, add small dots of melted chocolate or a little prepared icing for eyes and noses. Let any decoration set before stacking or wrapping the bears.
Brownie bites: If your cutter is much larger or smaller than the suggested size, the number of finished bears will change. Use all the scraps as bite-size pieces or layer them with whipped cream and fruit for a simple dessert.
What to Serve With It
Serve the bears on their own with coffee, tea, or cold milk. For dessert, add vanilla ice cream, sliced strawberries, or a spoonful of softly whipped cream. A bowl of fresh fruit balances the rich chocolate, while a small scoop of ice cream makes the scraps feel intentional rather than leftover.
For a party platter, arrange the bears in a single layer so their outlines stay visible. If you have decorated them, give the icing time to set before adding them to the plate. The plain brownie bears travel well in a covered container, making them easy to bring to a gathering.
Make-Ahead, Storage and Reheating
You can bake the brownie slab a day ahead, cool it completely, and keep it covered in the refrigerator. Cut the shapes once the slab is cold, or cut them on the day you plan to serve them. Chilling before cutting is especially useful if the room is warm.
For food safety, refrigerate leftovers within 2 hours of baking or serving. Store the brownies in an airtight container in the refrigerator for 3 to 4 days. Separate decorated layers with parchment so the faces do not stick together.
To freeze, place the cooled, undecorated bears in a freezer-safe container with parchment between layers. Freeze for up to 3 to 4 months for best quality. Thaw them, covered, in the refrigerator or at room temperature; add decorations after thawing if you want the neatest finish.
These brownies do not need reheating to taste good. If you prefer them slightly warm, warm an individual bear briefly in the microwave until just softened, then serve at once. Avoid heating the whole batch, since repeated warming can dry the edges.
Recipe Card
Servings: 8 to 10, depending on cutter size
Prep time: 20 minutes
Cook time: 25 to 30 minutes
Cooling and chilling: About 2 hours
Total time: About 2 hours 45 minutes
Ingredients
- 1 cup unsalted butter
- 2 cups granulated sugar
- 4 large eggs
- 1 teaspoon vanilla extract
- 1 cup all-purpose flour
- 1 cup unsweetened cocoa powder
- 1 teaspoon baking powder
- 1/2 teaspoon salt
- 1 cup chocolate chips, optional
Equipment: 1 teddy bear-shaped cookie cutter; 1 9-by-13-inch baking pan; parchment paper.
Condensed Instructions
- Heat oven to 350°F. Line the pan with parchment.
- Melt butter, cool until warm, and whisk in cocoa until smooth.
- Whisk in sugar, eggs one at a time, and vanilla.
- Whisk flour, baking powder, and salt separately. Fold into the chocolate mixture just until combined; fold in chips if using.
- Spread in the pan and bake for 25 to 30 minutes, until the center is set, shows moist crumbs on a toothpick, and reaches 160°F.
- Cool on a rack for at least 1 1/2 hours, then chill for 30 minutes.
- Lift the slab onto a board. Press the cutter straight down, lifting without twisting, and serve the bear shapes.
Frequently Asked Questions
Can I bake these in a different pan?
A pan with a different area changes the brownie thickness and bake time. A smaller pan makes a thicker slab that may need longer to bake; a larger pan makes a thinner slab that can bake faster and may produce bears that are too thin to lift neatly. The 9-by-13-inch pan gives a useful balance for cutting shapes.
Can I use a boxed brownie mix?
Yes. Bake the mix in a parchment-lined rectangular pan and follow its package directions, checking for a set center. Cool it completely, chill briefly, and cut the shapes in the same way. A very fudgy mix may need extra chilling to hold its outline.
Do I have to use a teddy bear cutter?
No. Any sturdy cookie cutter can be used, though simple shapes with rounded edges are easiest to lift from brownies. If the cutter has narrow details, chill the slab well and clean the cutter between cuts.
Can I cut the brownies while they are still in the pan?
You can, but the pan can limit where the cutter reaches and makes it harder to lift each bear without bending it. Lifting the slab out on parchment first gives you room to press straight down and move the shapes to a plate.
Why are there brownie scraps?
A cutter removes the spaces between the bear shapes, so scraps are expected. Use them as snack pieces, crumble them over ice cream, or layer them into a dessert cup. Cutting the bears close together reduces waste.
Can I make the brownies without chocolate chips?
Yes. The chips are optional and do not provide the structure of the brownie. Leaving them out gives a smoother slab and can make the cutter edges a little cleaner.
How do I keep the bears from drying out?
Do not bake until the toothpick comes out completely clean; moist crumbs are the cue to stop. Cool the slab, then store the bears in an airtight container and refrigerate leftovers promptly.