
These vegan caramel apples have crisp fruit under a thick, chewy coating made with coconut cream, vegan butter, and pantry-friendly sugar. They’re a festive treat for a fall afternoon, a party, or any day you want a proper caramel apple without dairy.
The key is cooking the caramel to the right temperature and starting with clean, completely dry apples. The coating sets into a soft, buttery layer with a light coconut note, while tart apples keep each bite from tasting overly sweet. Add chopped nuts, sprinkles, or a little flaky salt while the caramel is still tacky.
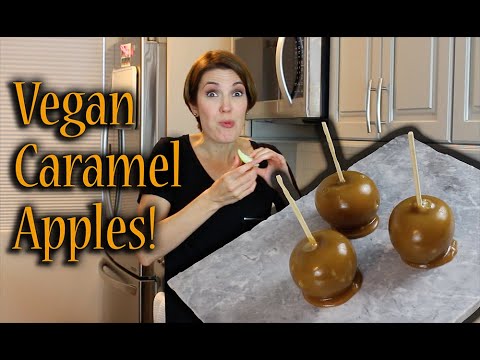
Why This Recipe Works
Caramel needs enough water cooked off to cling to an apple instead of running down its sides. A candy thermometer makes that point repeatable: cook the mixture to 245–248°F, the firm-ball range. At this temperature the coating sets chewy rather than staying syrupy. A few degrees matter, so use the temperature as your main guide and take the pan off the heat promptly.
Corn syrup helps limit sugar crystallization, which can make caramel grainy. Coconut cream and vegan butter add fat and give the coating a rounded, creamy texture. Using full-fat coconut cream is important; a thin carton of coconut drink has too much water for the same result.
Finally, a clean, dry apple gives the caramel something to grip. Store-bought apples can have a waxy surface, so washing them with hot water and rubbing them dry helps remove residue. Let them return to room temperature and dry thoroughly before dipping. Even a small film of water or condensation can make the coating slide.
Ingredients
- 6 medium firm apples, about 3 pounds total, such as Granny Smith, Honeycrisp, or Fuji
- 6 sturdy wooden sticks, about 5 inches long
- 1 cup granulated sugar
- 1/2 cup light corn syrup
- 1/2 cup full-fat coconut cream, well stirred
- 4 tablespoons vegan butter, cut into small pieces
- 1 teaspoon vanilla extract
- 1/4 teaspoon fine salt
- 1 cup finely chopped nuts or sprinkles, optional, for coating
- 1/2 teaspoon flaky salt, optional, for finishing
Ingredient Notes
Apples: Firm, crisp apples hold their shape and offer a pleasant contrast to the chewy caramel. Tart Granny Smith apples balance the sweetness especially well; sweeter varieties work too. Medium apples are easier to coat and eat than very large ones. If your apples have stems, remove them before inserting the sticks.
Granulated sugar: This is the main source of sweetness and structure. Regular white granulated sugar gives a predictable result. Avoid swapping in brown sugar for all of it; its moisture and molasses change how the caramel cooks.
Light corn syrup: It helps keep the cooked sugar smooth and reduces the chance of graininess. Golden syrup can work as a substitute, though it may add a mild caramel flavor of its own. Maple syrup is not a reliable one-for-one replacement here because its water content and composition differ.
Coconut cream: Use canned, unsweetened, full-fat coconut cream, or the thick portion from a can of full-fat coconut milk. Do not use sweetened cream of coconut or a low-fat coconut beverage. The caramel can have a faint coconut aroma, but the sugar and vanilla keep it from tasting like a strongly flavored coconut candy.
Vegan butter: A firm stick-style vegan butter is preferable to a soft tub spread, which may contain more water. The butter adds richness and helps make the coating pliable. Plant-based butter varies by brand, so temperature is a more dependable cue than cooking time alone.
Vanilla and salt: Vanilla rounds out the cooked sugar, and salt sharpens the flavor. Add the vanilla after cooking; heating it for the entire boil can dull its aroma. Fine salt belongs in the caramel, while flaky salt is best sprinkled on the outside.
Instructions
- Prepare the apples. Wash each apple under hot running water, rubbing the skin with a clean towel to remove any waxy residue. Dry very thoroughly, including around the stem end. Remove the stems, insert a wooden stick about 1 inch into each apple, and set the apples on a dry tray at room temperature. The skins should feel completely dry, with no beads of water. This preparation helps the caramel adhere.
- Set up the dipping area. Line a rimmed baking sheet with parchment paper or a silicone baking mat. Put any chopped nuts or sprinkles in a shallow bowl. Have the apples and toppings within reach before you start cooking; hot caramel thickens as it cools, so preparation makes dipping quicker and safer. No oven is needed.
- Combine the caramel ingredients. Add the sugar, corn syrup, coconut cream, vegan butter, and fine salt to a heavy-bottomed, medium saucepan. Set a candy thermometer in the pan so its tip is in the mixture without touching the bottom. Heat over medium, stirring gently until the butter melts and the sugar looks dissolved. The mixture should be smooth and begin to bubble evenly. Dissolving the sugar before a full boil reduces the risk of grainy caramel.
- Cook to temperature. Once the mixture reaches a steady boil, stop stirring. Cook until the thermometer reads 245–248°F, usually about 10–15 minutes after it begins boiling, though the time varies with the pan and burner. The caramel should be glossy, thicker than it was at the start, and bubbling steadily. If using a thermometer, trust the temperature rather than the clock. Keep the pan on the burner only as long as needed; higher temperatures make a firmer, harder coating.
- Flavor the caramel. Remove the pan from the heat as soon as it reaches the target temperature. Let the bubbling settle for about 30 seconds, then carefully stir in the vanilla. The mixture will bubble briefly. It should look smooth and pour in a thick ribbon from a spoon. Rest it for 2–3 minutes so it thickens slightly, but do not wait until it becomes stiff.
- Dip the apples. Tilt the saucepan so the caramel gathers to one side. Holding an apple by its stick, dip it and turn it to cover the fruit almost to the top. Lift it out and rotate slowly over the pan for a few seconds, allowing excess caramel to fall back. Scrape the bottom lightly against the pan’s edge, then place the apple stick-side up on the lined tray. A thin, even coating should cling to the apple rather than stream off in long drips.
- Add toppings and let the coating set. While the caramel is still tacky, roll or sprinkle on nuts or sprinkles; finish with a pinch of flaky salt if desired. Repeat with the remaining apples, working steadily. Leave them at room temperature for 30–45 minutes, until the coating feels set and no longer shifts when the tray is nudged. If the caramel becomes too thick to dip, warm it over very low heat for a short time, stirring gently.
Tips for Success
- Get every drop of moisture off the apples. Dry them with a clean towel, then let them air-dry for a few minutes. Don’t dip apples straight from the refrigerator; condensation can form on their skins.
- Use a heavy saucepan. A thick base distributes heat more evenly and reduces scorching. Choose a pan with room for the caramel to bubble without coming close to the rim.
- Check the thermometer placement. The sensing tip should sit in the caramel, not rest against the pan. If it touches the bottom, it can read hotter than the mixture.
- Keep the apples close by. Have sticks inserted and toppings ready before the caramel reaches temperature. The caramel is hottest immediately after cooking, so dip carefully and keep hands away from the pan.
- Don’t overcook the batch. Start checking closely as the temperature approaches 240°F. At 245–248°F, take it off the heat; continuing to cook can make the coating too hard once cool.
- Use a gentle rewarming method. If the caramel thickens before all apples are dipped, place the saucepan over very low heat and stir until it loosens. Avoid adding water, which can make the coating runny or splatter.
Troubleshooting
The caramel slides off the apples. The most common cause is moisture, wax, or condensation on the skin. Wash and rub the apples well, then dry them completely and use them at room temperature. If the apples are clean and dry, the caramel may not have reached a high enough temperature; next time, verify the thermometer reading and cook to 245–248°F.
The caramel is grainy. Sugar crystals may have formed on the sides of the pan or the mixture may have been stirred after boiling. Stir only until the sugar dissolves, then leave it alone while it boils. Corn syrup helps, but it cannot prevent every crystal if the pan is disturbed or sugar crystals are scraped into the mixture.
The coating is too soft or runs into a puddle. It may have been undercooked, or the apples may have been damp. Check the thermometer and bring the next batch to the stated range. For apples already dipped, let them finish cooling before moving them; refrigerating them will firm the caramel, although moisture may appear on the surface later.
The coating is hard or brittle. The caramel likely went above the target temperature. Use a reliable thermometer and remove the pan promptly. A small amount of variation between thermometers is possible, so focus on a consistent reading rather than extending the cook time after the target.
The caramel thickens before the last apples are coated. Return the saucepan to very low heat briefly, stirring just until the caramel flows again. If it has become fully stiff, it may not loosen evenly; avoid trying to thin it with water or plant milk.
The caramel is patchy around the top. Check that the apple is dry near the stem and that the stick is firmly inserted. Tilt the pan to make a deeper pool of caramel, then rotate the apple through it rather than trying to spread a shallow layer with a spoon.
Variations
Chocolate-dipped: Let the caramel coating set, then dip the lower half of each apple in melted dairy-free chocolate. Put the apples back on parchment until the chocolate is firm. Keep the chocolate layer fairly thin so it does not overwhelm the caramel.
Nutty crunch: Roll the freshly dipped apples in finely chopped toasted pecans, peanuts, or almonds. Small pieces cling more evenly than large chunks. Check packaged toppings if you need to avoid specific allergens.
Spiced caramel: Stir 1/2 teaspoon ground cinnamon into the caramel with the vanilla. A small pinch of ground ginger is another option. Keep the additions modest so the caramel still coats smoothly.
Salted caramel: Increase the fine salt in the caramel to 1/2 teaspoon and finish each apple with a few flakes of salt. Salt can vary in intensity, so add the finishing salt lightly.
Mini caramel apples: Use a melon baller to make small apple balls, pat them very dry, and insert short wooden picks. Dip quickly and expect to use more coating per bite because each piece has more exposed surface relative to its size.
What to Serve With It
Serve caramel apples as a dessert on their own, or slice them into wedges just before eating for easier sharing. A sharp knife and a stable cutting board make slicing safer; keep the stick in place while cutting, then remove it if it gets in the way. They pair well with unsweetened tea, coffee, or a glass of cold plant milk, which balances the rich coating without adding another sweet element.
For a dessert spread, set them beside fresh fruit, popcorn, or a simple batch of dairy-free cookies. If serving guests, keep whole apples on a tray and offer toppings separately. Slice only what will be eaten soon, since cut apple flesh browns and loses its crisp texture faster.
Make-Ahead, Storage and Reheating
You can wash and dry the apples, insert the sticks, and arrange the toppings a few hours ahead. Keep the prepared apples at room temperature in a dry place, not in the refrigerator, so condensation does not form on their skins. The caramel is best cooked shortly before dipping because it thickens as it cools.
Once coated, place the apples in a single layer in an airtight container, or wrap each one loosely in food-safe cellophane after the caramel has set. Refrigerate within 2 hours, and eat within 3–4 days. Refrigeration can make the apple less crisp and may cause condensation when it warms, so let an apple stand briefly at room temperature before serving and expect some surface moisture. Do not leave prepared apples out for more than 2 hours, or more than 1 hour when the temperature is above 90°F.
Freezing is not recommended: thawed apples tend to become soft and watery, and the caramel can turn sticky or separate. Reheating the finished apples is not recommended either. If leftover caramel is still in the saucepan, warm it gently over low heat to loosen it for dipping; do not microwave an apple with its stick.
Recipe Card
Servings: 6 apples
Prep time: 20 minutes
Cook time: 10–15 minutes
Set time: 30–45 minutes
Total time: About 1 hour 5 minutes to 1 hour 20 minutes
Oven: Not needed
Ingredients
- 6 medium firm apples
- 6 sturdy wooden sticks, about 5 inches long
- 1 cup granulated sugar
- 1/2 cup light corn syrup
- 1/2 cup full-fat coconut cream, well stirred
- 4 tablespoons vegan butter, cut into small pieces
- 1 teaspoon vanilla extract
- 1/4 teaspoon fine salt
- 1 cup chopped nuts or sprinkles, optional
- 1/2 teaspoon flaky salt, optional
Condensed steps
- Wash and thoroughly dry the apples. Remove stems, insert sticks, and bring apples to room temperature.
- Line a tray with parchment. Set out any toppings.
- Combine sugar, corn syrup, coconut cream, vegan butter, and fine salt in a heavy saucepan. Stir over medium heat until smooth and the sugar dissolves.
- Stop stirring once the mixture boils. Cook to 245–248°F, usually 10–15 minutes, checking the thermometer rather than relying on time.
- Remove from the heat, wait about 30 seconds, then stir in vanilla. Rest 2–3 minutes.
- Dip each apple, let excess caramel drip back into the pan, and set it on the prepared tray. Add toppings while tacky.
- Let stand at room temperature for 30–45 minutes, until set. Refrigerate leftovers within 2 hours.
Frequently Asked Questions
Do I need a candy thermometer?
A candy thermometer is the most reliable way to reach the right stage. The difference between a chewy coating and a hard one can be only a few degrees. Make sure the tip is immersed in the caramel without touching the pan bottom. If you do not have one, a cold-water test is less precise: a small drop cooled in cold water should form a firm, pliable ball, but temperature is easier to judge consistently.
Why does caramel not stick to apples?
Apples may have natural wax, leftover produce coating, or moisture on the skin. Wash and rub them under hot water, dry them carefully, and allow them to come fully to room temperature. A caramel cooked below the target temperature can also be too loose to adhere well.
Can I use coconut milk instead of coconut cream?
Yes, if it is full-fat canned coconut milk. Stir the can well and measure 1/2 cup, or use the thick cream from the top. Do not use a refrigerated carton of coconut beverage, which is much thinner and will change the caramel’s water content.
Can I make these without corn syrup?
Golden syrup is the closest practical substitute and can work in the same amount, though the flavor may be slightly different. Other liquid sweeteners are not always interchangeable in a cooked caramel because their water content and sugar makeup vary. Without an invert syrup, there is also a greater chance of crystallization.
Can I make the caramel ahead?
It is best to make it just before dipping. As it cools, it firms and becomes difficult to spread into an even coating. If it thickens while you work, warm it over very low heat and stir until it flows again.
How do I keep toppings from falling off?
Add them immediately after dipping, while the caramel is still tacky. Use finely chopped pieces and gently press them into the coating rather than waiting until the caramel has set.
Should caramel apples be refrigerated?
Yes. Refrigerate them within 2 hours and eat within 3–4 days. Chilling can soften the apple over time, and condensation may form as the apples warm, so they are best enjoyed soon after dipping.
Can I use a different kind of apple?
Yes. Choose a firm, crisp apple that is large enough to dip comfortably. Tart apples bring the clearest sweet-tart contrast, while sweeter apples make a milder dessert. Avoid bruised or soft fruit because it is harder to coat neatly and less pleasant to bite.