
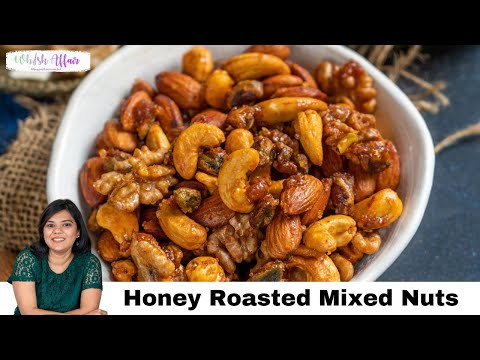
Honey roasted mixed nuts are a sweet-salty snack made by coating almonds, cashews, pecans, walnuts, and pistachios in warm honey and butter, then baking them until glossy and fragrant. They’re easy to make with a handful of pantry ingredients and work just as well for an afternoon snack as they do on a cheese board.
This version uses a moderate oven and a thin coating, so the honey has time to cling without scorching. A little salt keeps the sweetness in check; cinnamon and vanilla are optional ways to make the flavor warmer and rounder. The nuts come out sticky when hot, then firm up as they cool, with a crisp-edged coating and a tender crunch inside.
Why This Recipe Works
Honey browns quickly, especially where it pools on a hot pan. Baking at 300°F gives the nuts time to toast while lowering the chance that the coating will darken before the centers are warm and fragrant. Stirring once during baking redistributes the glaze and helps prevent a concentrated patch of honey from becoming bitter.
Butter loosens the honey into a pourable coating and helps it spread across the nuts. The amount is deliberately small: enough to help the glaze cling, but not so much that the nuts sit in a puddle. Salt brings out the toasted, nutty flavors and balances the honey. Once out of the oven, the coating is soft; cooling on the pan lets it set without requiring extra sugar or a separate candy-making step.
A single layer matters, too. Nuts piled on top of one another steam rather than toast evenly, and crowded clusters can stay tacky. A rimmed baking sheet keeps the nuts spread out and contains any drips. Parchment makes it easier to release the cooled coating and clean the pan.
Ingredients
- 2 cups mixed nuts, preferably raw and unsalted: almonds, cashews, pecans, walnuts, and pistachios
- 1/4 cup honey
- 1 tablespoon unsalted butter
- 1/2 teaspoon fine salt
- 1/2 teaspoon ground cinnamon, optional
- 1/4 teaspoon vanilla extract, optional
Ingredient Notes
Mixed nuts: A combination of almonds, cashews, pecans, walnuts, and pistachios gives a varied crunch and flavor. Use raw, unsalted nuts when possible so you can control both the roast and the salt. If using pre-roasted nuts, reduce the baking time and watch closely; they need less time to toast and can become bitter if baked too long. Salted nuts can be used, but reduce or omit the added salt.
Honey: Honey provides the main sweetness and the sticky glaze. Any liquid honey works. A strongly flavored honey will be more noticeable in the finished snack, while a mild one lets the nuts lead. Maple syrup can replace the honey, but it makes a different, thinner-tasting coating and may not set in quite the same way.
Unsalted butter: Butter gives the honey a smoother texture and adds a gentle richness. If you only have salted butter, use it and leave out the measured salt at first; taste a cooled nut before adding any more salt next time. For a dairy-free version, use a neutral plant-based butter that is suitable for baking.
Salt: Fine salt disperses evenly through the glaze. If using coarse salt, measure the same amount but expect a more noticeable, uneven crunch. You can also sprinkle a small pinch of flaky salt over the warm nuts after baking.
Cinnamon and vanilla: Cinnamon adds a warm aroma, while vanilla rounds out the honey. Both are optional, and the nuts are flavorful without them. For a different profile, use a pinch of ground ginger or cardamom in place of the cinnamon; keep additions modest so they don’t overwhelm the toasted nuts.
Instructions
- Prepare the pan and oven. Heat the oven to 300°F. Line a rimmed baking sheet with parchment paper. Set a rack in the middle of the oven. The parchment helps release the honey coating after it cools, and the moderate temperature gives the nuts time to toast without quickly scorching the glaze.
- Warm the honey and butter. Put the honey and butter in a small microwave-safe bowl and heat in short bursts, stirring between each, just until the butter has melted and the mixture is fluid, about 20 to 40 seconds total depending on the microwave. Alternatively, warm them together in a small saucepan over low heat. The mixture should be warm and pourable, not bubbling or boiling; overheating can make the honey harder to handle and more prone to darkening in the oven.
- Season and coat the nuts. Stir the salt, cinnamon if using, and vanilla if using into the warm honey mixture. Add the nuts and toss until they look lightly and evenly glazed. Scrape the bowl so the honey is distributed rather than left behind. A thin, even coating is the goal; excess glaze at the bottom of the bowl can make sticky puddles on the pan.
- Arrange in one layer. Tip the nuts onto the prepared sheet and spread them into a single layer, separating larger clumps. Leave a little space between pieces where possible. They should look glossy, not submerged in honey. This gives hot air room to move around the nuts and helps them toast rather than steam.
- Bake and stir once. Bake for 18 to 22 minutes, stirring carefully after about 10 minutes and spreading the nuts back into one layer. Begin checking at 16 minutes if your nuts were already roasted or your oven runs hot. Look for a fragrant, lightly toasted smell and a coating that bubbles gently in small spots. The honey should be amber, not dark brown or smoking; remove the pan promptly if it starts to smell sharp or burnt.
- Cool completely on the pan. Take the sheet out and spread the nuts apart with a lightly oiled spatula while they are still warm, if you want individual pieces rather than clusters. Let them cool undisturbed for at least 30 minutes. They will feel tacky at first and become firmer as the coating cools. Don’t judge the final texture while they’re hot, and don’t seal them in a container until fully cool or trapped steam can soften the coating.
Tips for Success
- Choose similar-sized pieces. Whole nuts and large halves roast at a different pace from small broken pieces. If your mix has lots of small fragments, add them during the last 8 to 10 minutes so they don’t overbrown.
- Use a rimmed pan, not a flat cookie sheet. The rim contains the glaze and makes stirring safer. Keep the nuts in a single layer for the most even result.
- Trust your nose as well as the timer. Toasted nuts smell warm and nutty. A bitter, acrid smell means the honey or nuts are scorching; take the pan out rather than waiting for the listed time.
- Stir gently but thoroughly. Separate sticky areas and turn the nuts so they’re exposed evenly. A silicone spatula is useful because it scrapes up the glaze without tearing the parchment.
- Cool before storing. Warm nuts release moisture into a closed container, which can make the coating tacky. Wait until they reach room temperature.
- Plan for clumps. Honey naturally makes nuts stick together. Separate them while warm for a snack mix, or leave small clusters intact for topping yogurt, oatmeal, or a dessert.
- Adjust salt after cooling. Salt tastes different in a hot glaze than on a cooled nut. If you want a stronger salty finish, sprinkle a little over the warm nuts instead of adding a large amount to the honey mixture.
Troubleshooting
The nuts are still sticky after cooling. A thin honey coating can remain a little tacky, especially in humid weather. If the nuts are only slightly sticky, spread them out and let them cool longer in a dry room. If they feel wet or heavily coated, return them to a 250°F oven for 5 to 8 minutes, then cool completely on the pan. Avoid sealing them while warm.
The coating is bitter or very dark. The honey has likely overheated. Oven temperatures vary, and honey can darken quickly near the end of baking, so use the aroma and color cues rather than relying only on the timer. Next time, check earlier, bake on the middle rack, and make sure the nuts are spread out rather than sitting in pools of glaze.
The nuts taste toasted on the outside but not crisp. They may need more time to cool, or the pan may have been crowded. Let them cool fully before deciding. If they remain soft, bake them for a few more minutes at 250°F, watching closely, then cool again in a single layer.
The honey coating is patchy. The nuts may not have been tossed thoroughly, or the honey and butter may have cooled before coating. Warm the glaze only until fluid, stir it well, and toss the nuts until every piece has a light sheen. Scrape the bowl as you transfer them to the pan.
The nuts are clumped together. This is normal as honey cools. Separate them with a spatula during the first few minutes after baking if you want individual pieces. If they’ve already set into clusters, break them apart by hand once completely cool or serve them as clusters.
Variations
More spice: Add a small pinch of ground ginger, cardamom, or cayenne along with the cinnamon. Start with a little; spices become more pronounced as the warm nuts cool.
Extra salty-sweet: Finish the nuts with a light pinch of flaky salt as soon as they come out of the oven. This gives a crisp salt hit without increasing the salt mixed into the glaze.
Citrus aroma: Stir finely grated orange zest into the honey mixture before tossing. Use only the colored outer peel, not the bitter white pith, and cool the nuts thoroughly before storing.
Different nut mix: Keep the total at 2 cups and swap in hazelnuts or macadamias if you like. For an even roast, use pieces of roughly similar size and check the pan early because smaller nuts and pieces brown sooner.
Less sweet: Use 3 tablespoons of honey instead of 1/4 cup and toss especially well. The coating will be lighter and less likely to form clusters, though it may not cover every surface as evenly.
What to Serve With It
Serve the nuts in a small bowl as a snack, or add them to a cheese board with firm and soft cheeses, fresh fruit, and plain crackers. Their sweet-salty coating pairs well with sharp cheese and fruit that is tart rather than very sweet. Keep them in a separate bowl if the board includes moist foods, since moisture softens the glaze.
For breakfast, scatter a few over oatmeal, plain yogurt, or sliced fruit just before serving so they stay crunchy. They’re also good chopped over roasted squash or a simple green salad; add them at the end rather than tossing them into a warm dressing. For a small dessert, serve a handful alongside fruit or vanilla ice cream. The recipe is sweet enough to stand on its own, so use it as a topping rather than adding a large amount of extra sweetener.
Make-Ahead, Storage and Reheating
Make the nuts up to a week ahead for the best texture. Cool them completely, then store in an airtight container in a cool, dry place away from direct sunlight. Keep the container dry and avoid storing the nuts beside a steaming kettle or other source of moisture. If they soften, spread them on a parchment-lined pan and warm at 250°F for 5 to 8 minutes, then cool fully before returning them to the container.
For longer storage, refrigerate in an airtight container at 40°F or below and use within about 1 month for best quality. Cold nuts can pick up condensation when moved to a warm room, so let the closed container come closer to room temperature before opening it. For freezing, seal the cooled nuts in a freezer-safe container or bag, remove as much excess air as practical, and freeze at 0°F or below. Use within 3 months for best flavor and texture. USDA guidance is that food kept continuously frozen at 0°F remains safe indefinitely; the 3-month period here is a quality target, since nuts can lose flavor or take on stale, oily notes over time. Thaw them in their closed container, then crisp briefly in a low oven if needed.
Discard the batch if it develops mold, an off smell, or an unusual appearance. Keep in mind that nuts are a common allergen; label the container clearly if you’re serving them to others.
Recipe Card
Servings: About 8 snack portions
Prep time: 5 minutes
Cook time: 18 to 22 minutes
Total time: About 40 minutes, including cooling
Ingredients
- 2 cups mixed nuts, preferably raw and unsalted
- 1/4 cup honey
- 1 tablespoon unsalted butter
- 1/2 teaspoon fine salt
- 1/2 teaspoon ground cinnamon, optional
- 1/4 teaspoon vanilla extract, optional
Condensed Instructions
- Heat the oven to 300°F and line a rimmed baking sheet with parchment.
- Warm the honey and butter until fluid. Stir in the salt, cinnamon, and vanilla, if using.
- Toss the nuts with the glaze until lightly coated, then spread in one layer on the pan.
- Bake for 18 to 22 minutes, stirring once at about 10 minutes. Remove when fragrant and lightly toasted, before the honey becomes dark.
- Cool completely on the pan for at least 30 minutes. Break apart or leave in clusters, then store airtight.
Frequently Asked Questions
Can I use roasted nuts instead of raw nuts?
Yes. Use unsalted roasted nuts if you can, and start checking several minutes earlier than the recipe suggests. They need less time in the oven, and the goal is to warm them and set the coating without browning the nuts a second time.
Can I make honey roasted nuts without butter?
Yes, though the coating may be less rich and can be a little more uneven. Replace the butter with a neutral plant-based butter if you want a similar texture, or omit it and toss the nuts very thoroughly with the honey. Watch the pan closely because honey can darken quickly.
Why are my nuts sticky even after they cool?
Honey coatings can stay slightly tacky, especially when the room is humid or the nuts have a thick layer of glaze. Let them cool longer in a dry place. If they still feel wet rather than just a little tacky, warm them at 250°F for a few minutes and cool them again in a single layer.
Can I make these on the stovetop?
You can warm the honey, butter, and nuts together in a wide skillet over low heat, stirring constantly until the nuts smell toasted. The oven method is easier to heat evenly and leaves more room to spread the nuts out for cooling. On the stovetop, keep the heat low because honey can scorch where it touches the pan.
Can I use maple syrup instead of honey?
Maple syrup can be used, but expect a different flavor and a coating that may stay softer or less glossy. Keep the same amount, spread the nuts in one layer, and rely on the visual cues rather than assuming the exact same setting time.
How do I keep the nuts from sticking to the parchment?
Use parchment rather than wax paper, spread the nuts out, and let them cool fully before lifting them. If a little glaze sticks, loosen it gently with a thin spatula. A silicone baking mat can also work, but follow the manufacturer’s temperature limits.
Can I double the recipe?
Yes. Use two rimmed baking sheets rather than piling the nuts onto one. Rotate the pans between oven racks and switch their positions when you stir, since ovens can brown one area faster than another. Check both pans for doneness separately.
How do I make the nuts less sweet?
Reduce the honey to 3 tablespoons and keep the other ingredients the same. The coating will be thinner, so toss thoroughly and spread the nuts carefully. A small finishing pinch of salt can make the lighter glaze taste balanced without adding more honey.